
 SpringBoot3-核心原理
# 事件和监听器
# 生命周期监听
场景:监听应用的生命周期
# 监听器 - SpringApplicationRunListener
自定义 SpringApplicationRunListener 来监听事件;
springboot 在
spring-boot.jar中配置了默认的 Listener,如下org.springframework.boot.SpringApplicationRunListener=\ org.springframework.boot.context.event.EventPublishingRunListener1
2编写
SpringApplicationRunListener实现类, 在META-INF/spring.factories中配置org.springframework.boot.SpringApplicationRunListener=自己的Listener,还可以指定一个有参构造器,接受两个参数(SpringApplication application, String[] args)public class CustomListener implements SpringApplicationRunListener { @Override public void starting(ConfigurableBootstrapContext bootstrapContext) { System.out.println("==================正在启动=================="); } @Override public void environmentPrepared(ConfigurableBootstrapContext bootstrapContext, ConfigurableEnvironment environment) { System.out.println("==================环境准备完成=================="); } @Override public void contextPrepared(ConfigurableApplicationContext context) { System.out.println("==================上下文准备完成=================="); } @Override public void contextLoaded(ConfigurableApplicationContext context) { System.out.println("==================上下文加载完成=================="); } @Override public void started(ConfigurableApplicationContext context, Duration timeTaken) { System.out.println("==================应用程序启动完成=================="); } @Override public void ready(ConfigurableApplicationContext context, Duration timeTaken) { System.out.println("==================应用程序准备就绪=================="); } @Override public void failed(ConfigurableApplicationContext context, Throwable exception) { System.out.println("==================应用程序启动失败=================="); } }1
2
3
4
5
6
7
8
9
10
11
12
13
14
15
16
17
18
19
20
21
22
23
24
25
26
27
28
29
30
31
32
33
34
35
36==================正在启动================== ==================环境准备完成================== . ____ _ __ _ _ /\\ / ___'_ __ _ _(_)_ __ __ _ \ \ \ \ ( ( )\___ | '_ | '_| | '_ \/ _` | \ \ \ \ \\/ ___)| |_)| | | | | || (_| | ) ) ) ) ' |____| .__|_| |_|_| |_\__, | / / / / =========|_|==============|___/=/_/_/_/ :: Spring Boot :: (v3.3.1) ==================上下文准备完成================== 2024-07-23T23:28:40.088+08:00 INFO 24212 --- [springboot3-learn] [ main] o.e.s.learn.Springboot3LearnApplication : Starting Springboot3LearnApplication using Java 21.0.2 with PID 24212 (D:\Java\workspace\springboot3-learn\target\classes started by dong5 in D:\Java\workspace\springboot3-learn) 2024-07-23T23:28:40.090+08:00 INFO 24212 --- [springboot3-learn] [ main] o.e.s.learn.Springboot3LearnApplication : The following 1 profile is active: "dev" ==================上下文加载完成================== 2024-07-23T23:28:40.996+08:00 INFO 24212 --- [springboot3-learn] [ main] o.s.b.w.embedded.tomcat.TomcatWebServer : Tomcat initialized with port 6578 (http) 2024-07-23T23:28:41.007+08:00 INFO 24212 --- [springboot3-learn] [ main] o.apache.catalina.core.StandardService : Starting service [Tomcat] 2024-07-23T23:28:41.007+08:00 INFO 24212 --- [springboot3-learn] [ main] o.apache.catalina.core.StandardEngine : Starting Servlet engine: [Apache Tomcat/10.1.25] 2024-07-23T23:28:41.053+08:00 INFO 24212 --- [springboot3-learn] [ main] o.a.c.c.C.[Tomcat].[localhost].[/] : Initializing Spring embedded WebApplicationContext 2024-07-23T23:28:41.053+08:00 INFO 24212 --- [springboot3-learn] [ main] w.s.c.ServletWebServerApplicationContext : Root WebApplicationContext: initialization completed in 927 ms _ _ |_ _ _|_. ___ _ | _ | | |\/|_)(_| | |_\ |_)||_|_\ / | 3.5.7 2024-07-23T23:28:41.626+08:00 WARN 24212 --- [springboot3-learn] [ main] ion$DefaultTemplateResolverConfiguration : Cannot find template location: classpath:/templates/ (please add some templates, check your Thymeleaf configuration, or set spring.thymeleaf.check-template-location=false) 2024-07-23T23:28:41.709+08:00 INFO 24212 --- [springboot3-learn] [ main] o.s.b.w.embedded.tomcat.TomcatWebServer : Tomcat started on port 6578 (http) with context path '/' 2024-07-23T23:28:41.715+08:00 INFO 24212 --- [springboot3-learn] [ main] o.e.s.learn.Springboot3LearnApplication : Started Springboot3LearnApplication in 1.982 seconds (process running for 2.54) ==================应用程序启动完成================== ==================应用程序准备就绪==================1
2
3
4
5
6
7
8
9
10
11
12
13
14
15
16
17
18
19
20
21
22
23
24
25
26
27
28
29
30
# 生命周期全流程
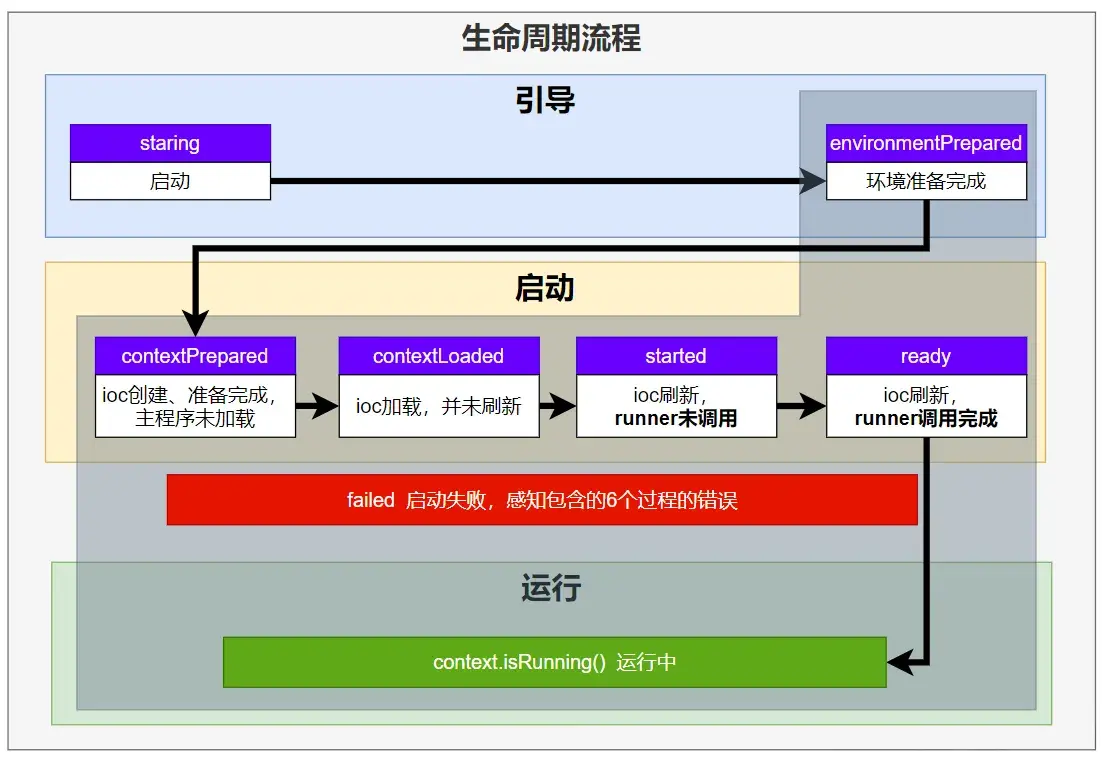
public ConfigurableApplicationContext run(String... args) {
    Startup startup = Startup.create();
    if (this.registerShutdownHook) {
        SpringApplication.shutdownHook.enableShutdownHookAddition();
    }
    DefaultBootstrapContext bootstrapContext = createBootstrapContext();
    ConfigurableApplicationContext context = null;
    configureHeadlessProperty();
    //读取所有的监听器
    SpringApplicationRunListeners listeners = getRunListeners(args);
    listeners.starting(bootstrapContext, this.mainApplicationClass);
    try {
        ApplicationArguments applicationArguments = new DefaultApplicationArguments(args);
        // 环境准备好(把启动参数等绑定到环境变量中),但是ioc还没有创建;【调一次】
        ConfigurableEnvironment environment = prepareEnvironment(listeners, bootstrapContext, applicationArguments);
        Banner printedBanner = printBanner(environment);
        context = createApplicationContext();
        context.setApplicationStartup(this.applicationStartup);
        //ioc容器创建并准备好,但是sources(主配置类)没加载。并关闭引导上下文;组件都没创建  【调一次】,在方法中最后一步完成了 ioc容器加载主配置类加载进去了。但是ioc容器还没刷新(我们的bean没创建)。
        prepareContext(bootstrapContext, context, environment, listeners, applicationArguments, printedBanner);
        //ioc容器刷新了(所有bean造好了),但是 runner 没调用。
        refreshContext(context);
        afterRefresh(context, applicationArguments);
        startup.started();
        if (this.logStartupInfo) {
            new StartupInfoLogger(this.mainApplicationClass).logStarted(getApplicationLog(), startup);
        }
        listeners.started(context, startup.timeTakenToStarted());
        callRunners(context, applicationArguments);
    }
    catch (Throwable ex) {
        throw handleRunFailure(context, ex, listeners);
    }
    try {
        if (context.isRunning()) {
            //这步之后完成了所有的应用调用
            listeners.ready(context, startup.ready());
        }
    }
    catch (Throwable ex) {
        throw handleRunFailure(context, ex, null);
    }
    return context;
}
2
3
4
5
6
7
8
9
10
11
12
13
14
15
16
17
18
19
20
21
22
23
24
25
26
27
28
29
30
31
32
33
34
35
36
37
38
39
40
41
42
43
44
# 事件触发时机
# 各种回调监听器
BootstrapRegistryInitializer:感知特定阶段:感知引导初始化META-INF/spring.factories- 创建引导上下文
bootstrapContext的时候触发。 - application.
addBootstrapRegistryInitializer(); - 场景:
进行密钥校对授权。
ApplicationContextInitializer:感知特定阶段: 感知 ioc 容器初始化
META-INF/spring.factories- application.addInitializers();
ApplicationListener:感知全阶段:基于事件机制,感知事件。 一旦到了哪个阶段可以做别的事
@Bean或@EventListener:事件驱动SpringApplication.addListeners(…)或SpringApplicationBuilder.listeners(…)META-INF/spring.factories
SpringApplicationRunListener:感知全阶段生命周期 + 各种阶段都能自定义操作; 功能更完善
META-INF/spring.factories
ApplicationRunner:感知特定阶段:感知应用就绪 Ready。卡死应用,就不会就绪
@Bean
CommandLineRunner:感知特定阶段:感知应用就绪 Ready。卡死应用,就不会就绪
@Bean
最佳实战:
- 如果项目启动前做事:
BootstrapRegistryInitializer和ApplicationContextInitializer - 如果想要在项目启动完成后做事:
ApplicationRunner和CommandLineRunner - 如果要干涉生命周期做事:
SpringApplicationRunListener - 如果想要用事件机制:
ApplicationListener
# 完整触发流程
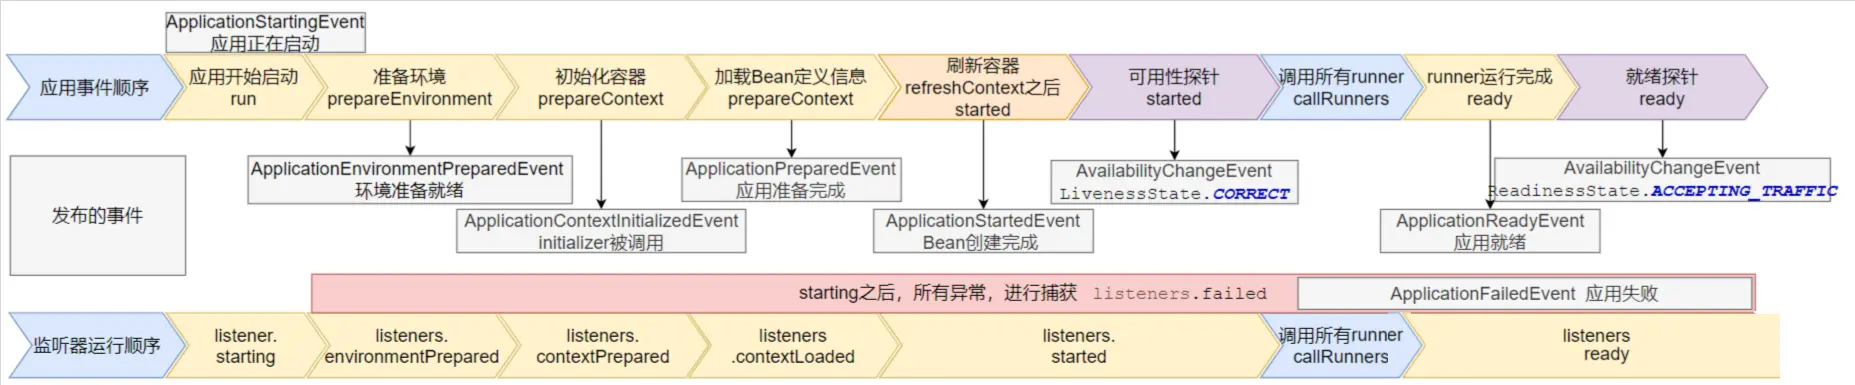
9 大事件触发顺序 & 时机
ApplicationStartingEvent:应用启动但未做任何事情,除过注册 listeners and initializers.ApplicationEnvironmentPreparedEvent:Environment 准备好,但 context 未创建.ApplicationContextInitializedEvent:ApplicationContext 准备好,ApplicationContextInitializers 调用,但是任何 bean 未加载ApplicationPreparedEvent:容器刷新之前,bean 定义信息加载ApplicationStartedEvent:容器刷新完成, runner 未调用
========= 以下就开始插入了探针机制 ============
AvailabilityChangeEvent:LivenessState.CORRECT应用存活; 存活探针ApplicationReadyEvent:任何 runner 被调用AvailabilityChangeEvent:ReadinessState.ACCEPTING_TRAFFIC就绪探针,可以接请求ApplicationFailedEvent:启动出错
//在spring.factories中配置或者在Application中SpringApplication.run之前调用
public class MyApplicationListener implements ApplicationListener <ApplicationEvent>{
    @Override
    public void onApplicationEvent(ApplicationEvent event) {
        System.out.println("==============event=============="+event);
    }
}
2
3
4
5
6
7
==============event==============org.springframework.boot.context.event.ApplicationStartingEvent[source=org.springframework.boot.SpringApplication@48793bef]
==================正在启动==================
==============event==============org.springframework.boot.context.event.ApplicationEnvironmentPreparedEvent[source=org.springframework.boot.SpringApplication@48793bef]
==================环境准备完成==================

  .   ____          _            __ _ _
 /\\ / ___'_ __ _ _(_)_ __  __ _ \ \ \ \
( ( )\___ | '_ | '_| | '_ \/ _` | \ \ \ \
 \\/  ___)| |_)| | | | | || (_| |  ) ) ) )
  '  |____| .__|_| |_|_| |_\__, | / / / /
 =========|_|==============|___/=/_/_/_/

 :: Spring Boot ::                (v3.3.1)

==============event==============org.springframework.boot.context.event.ApplicationContextInitializedEvent[source=org.springframework.boot.SpringApplication@48793bef]
==================上下文准备完成==================
2024-07-24T17:46:07.394+08:00  INFO 10696 --- [springboot3-learn] [           main] o.e.s.learn.Springboot3LearnApplication  : Starting Springboot3LearnApplication using Java 21.0.2 with PID 10696 (D:\Java\workspace\springboot3-learn\target\classes started by dong5 in D:\Java\workspace\springboot3-learn)
2024-07-24T17:46:07.396+08:00  INFO 10696 --- [springboot3-learn] [           main] o.e.s.learn.Springboot3LearnApplication  : The following 1 profile is active: "dev"
==============event==============org.springframework.boot.context.event.ApplicationPreparedEvent[source=org.springframework.boot.SpringApplication@48793bef]
==================上下文加载完成==================
2024-07-24T17:46:08.160+08:00  INFO 10696 --- [springboot3-learn] [           main] o.s.b.w.embedded.tomcat.TomcatWebServer  : Tomcat initialized with port 8080 (http)
2024-07-24T17:46:08.170+08:00  INFO 10696 --- [springboot3-learn] [           main] o.apache.catalina.core.StandardService   : Starting service [Tomcat]
2024-07-24T17:46:08.170+08:00  INFO 10696 --- [springboot3-learn] [           main] o.apache.catalina.core.StandardEngine    : Starting Servlet engine: [Apache Tomcat/10.1.25]
2024-07-24T17:46:08.213+08:00  INFO 10696 --- [springboot3-learn] [           main] o.a.c.c.C.[Tomcat].[localhost].[/]       : Initializing Spring embedded WebApplicationContext
2024-07-24T17:46:08.213+08:00  INFO 10696 --- [springboot3-learn] [           main] w.s.c.ServletWebServerApplicationContext : Root WebApplicationContext: initialization completed in 788 ms
 _ _   |_  _ _|_. ___ _ |    _
| | |\/|_)(_| | |_\  |_)||_|_\
     /               |
                        3.5.7
2024-07-24T17:46:08.658+08:00  WARN 10696 --- [springboot3-learn] [           main] ion$DefaultTemplateResolverConfiguration : Cannot find template location: classpath:/templates/ (please add some templates, check your Thymeleaf configuration, or set spring.thymeleaf.check-template-location=false)
2024-07-24T17:46:08.745+08:00  INFO 10696 --- [springboot3-learn] [           main] o.s.b.w.embedded.tomcat.TomcatWebServer  : Tomcat started on port 8080 (http) with context path '/'
==============event==============org.springframework.boot.web.servlet.context.ServletWebServerInitializedEvent[source=org.springframework.boot.web.embedded.tomcat.TomcatWebServer@17176b18]
==============event==============org.springframework.context.event.ContextRefreshedEvent[source=org.springframework.boot.web.servlet.context.AnnotationConfigServletWebServerApplicationContext@32cb636e, started on Wed Jul 24 17:46:07 HKT 2024]
2024-07-24T17:46:08.751+08:00  INFO 10696 --- [springboot3-learn] [           main] o.e.s.learn.Springboot3LearnApplication  : Started Springboot3LearnApplication in 1.807 seconds (process running for 2.338)
==============event==============org.springframework.boot.context.event.ApplicationStartedEvent[source=org.springframework.boot.SpringApplication@48793bef]
==============event==============org.springframework.boot.availability.AvailabilityChangeEvent[source=org.springframework.boot.web.servlet.context.AnnotationConfigServletWebServerApplicationContext@32cb636e, started on Wed Jul 24 17:46:07 HKT 2024]
==================应用程序启动完成==================
==============event==============org.springframework.boot.context.event.ApplicationReadyEvent[source=org.springframework.boot.SpringApplication@48793bef]
==============event==============org.springframework.boot.availability.AvailabilityChangeEvent[source=org.springframework.boot.web.servlet.context.AnnotationConfigServletWebServerApplicationContext@32cb636e, started on Wed Jul 24 17:46:07 HKT 2024]
==================应用程序准备就绪==================
2
3
4
5
6
7
8
9
10
11
12
13
14
15
16
17
18
19
20
21
22
23
24
25
26
27
28
29
30
31
32
33
34
35
36
37
38
39
40
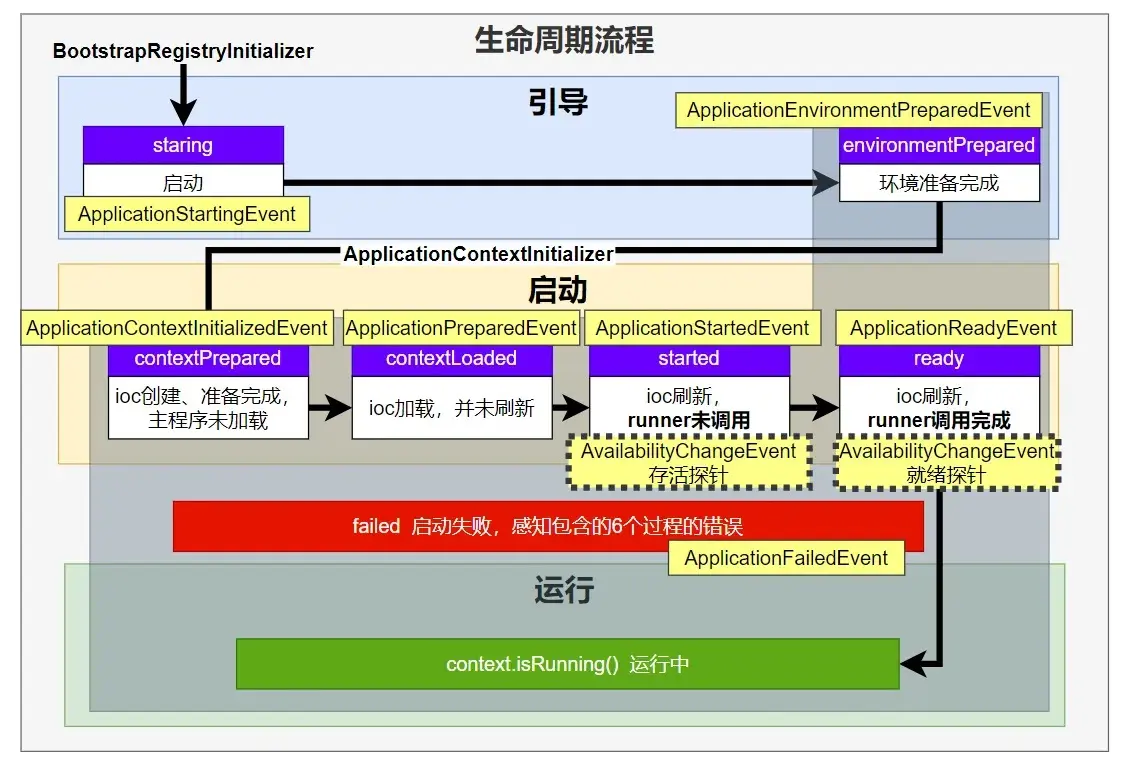
应用事件发送顺序如下:并且在 started 和 ready 完成后都会发布探针。这两个探针主要是为了给 K8S 使用。
//..............................
try {
        ApplicationArguments applicationArguments = new DefaultApplicationArguments(args);
        ConfigurableEnvironment environment = prepareEnvironment(listeners, bootstrapContext, applicationArguments);
        Banner printedBanner = printBanner(environment);
        context = createApplicationContext();
        context.setApplicationStartup(this.applicationStartup);
        prepareContext(bootstrapContext, context, environment, listeners, applicationArguments, printedBanner);
        refreshContext(context);
        afterRefresh(context, applicationArguments);
        startup.started();
        if (this.logStartupInfo) {
            new StartupInfoLogger(this.mainApplicationClass).logStarted(getApplicationLog(), startup);
        }
    	// started完成后发布了可用性探针
        listeners.started(context, startup.timeTakenToStarted());
    	//..............................
    	try {
			if (context.isRunning()) {
                 // 发布了就绪探针
				listeners.ready(context, startup.ready());
			}
		}
}
//..............................
@Override
public void started(ConfigurableApplicationContext context, Duration timeTaken) {
    context.publishEvent(new ApplicationStartedEvent(this.application, this.args, context, timeTaken));
    AvailabilityChangeEvent.publish(context, LivenessState.CORRECT);
}
2
3
4
5
6
7
8
9
10
11
12
13
14
15
16
17
18
19
20
21
22
23
24
25
26
27
28
29
30
感知应用是否存活了:可能植物状态,虽然活着但是不能处理请求。
应用是否就绪了:能响应请求,说明确实活的比较好。
# SpringBoot 事件驱动开发
应用启动过程生命周期事件感知(9 大事件)、应用运行中事件感知(无数种)。
- 事件发布:
ApplicationEventPublisherAware或注入:ApplicationEventMulticaster - 事件监听:
组件 + @EventListener
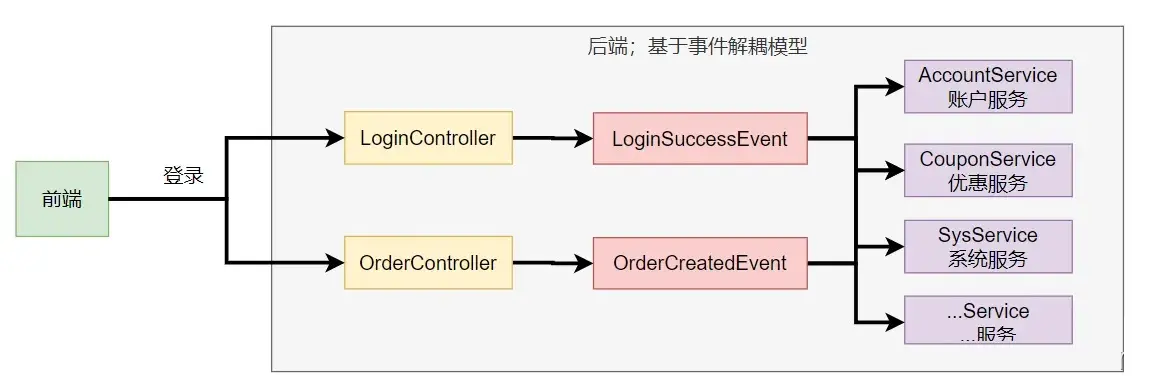

@RestController
public class LoginController {
    @Autowired
    private EventPublisher eventPublisher;

    /**
     * 登录
     * @param tUser 用户信息
     */
    @PostMapping("login")
    public void login(@RequestBody TUser tUser){
        // 登录成功后
        if(!tUser.getLoginName().equals("dfd") || !tUser.getPasswd().equals("dfd")){
            throw new RuntimeException("账密错误");
        }
        // 1. 记录登录信息
//        sysService.loginInfo(tUser);
        // 2. 加10积分
//        memberService.loginPoints(tUser);
        // 3. 随机一张优惠券
//        couponService.loginCoupon(tUser);

        //发送订阅消息
        LogonEvent logonEvent = new LogonEvent(tUser);
        eventPublisher.sendEvent(logonEvent);
    }
}
2
3
4
5
6
7
8
9
10
11
12
13
14
15
16
17
18
19
20
21
22
23
24
25
26
27
28
//事件发布者
@Service
public class EventPublisher implements ApplicationEventPublisherAware {

    /**
     * 底层发送事件用的组件,SpringBoot会通过ApplicationEventPublisherAware接口自动注入给我们
     * 事件是广播出去的。所有监听这个事件的监听器都可以收到
     */
    ApplicationEventPublisher applicationEventPublisher;

    /**
     * 所有事件都可以发
     * @param event
     */
    public void sendEvent(ApplicationEvent event) {
        //调用底层API发送事件
        applicationEventPublisher.publishEvent(event);
    }

    /**
     * 会被自动调用,把真正发事件的底层组组件给我们注入进来
     * @param applicationEventPublisher event publisher to be used by this object
     */
    @Override
    public void setApplicationEventPublisher(ApplicationEventPublisher applicationEventPublisher) {
        this.applicationEventPublisher = applicationEventPublisher;
    }
}
2
3
4
5
6
7
8
9
10
11
12
13
14
15
16
17
18
19
20
21
22
23
24
25
26
27
28
@Service
public class CouponService {

    @Order(1)
    @EventListener
    public void onEvent(LogonEvent logonEvent){
        System.out.println("===== CouponService ====感知到事件"+logonEvent);
        TUser user = (TUser) logonEvent.getSource();
        sendCoupon(user.getNickName());
    }

    public void sendCoupon(String username){
        System.out.println(username + " 随机得到了一张优惠券");
    }
}
2
3
4
5
6
7
8
9
10
11
12
13
14
15
# 自动配置原理
# 入门理解
应用关注的三大核心:场景、配置、组件
# 自动配置流程

导入
starter依赖导入
autoconfigure寻找类路径下
META-INF/spring/org.springframework.boot.autoconfigure.AutoConfiguration.imports文件启动,加载所有
自动配置类xxxAutoConfiguration- 给容器中配置功能
组件 组件参数绑定到属性类中。xxxProperties属性类和配置文件前缀项绑定@Contional派生的条件注解进行判断是否组件生效
- 给容器中配置功能
效果:
- 修改配置文件,修改底层参数
- 所有场景自动配置好直接使用
- 可以注入 SpringBoot 配置好的组件随时使用
# SPI 机制
- Java 中的 SPI(Service Provider Interface)是一种软件设计模式,用于在应用程序中动态地发现和加载组件。SPI 的思想是,定义一个接口或抽象类,然后通过在 classpath 中定义实现该接口的类来实现对组件的动态发现和加载。
- SPI 的主要目的是解决在应用程序中使用可插拔组件的问题。例如,一个应用程序可能需要使用不同的日志框架或数据库连接池,但是这些组件的选择可能取决于运行时的条件。通过使用 SPI,应用程序可以在运行时发现并加载适当的组件,而无需在代码中硬编码这些组件的实现类。
- 在 Java 中,SPI 的实现方式是通过在
META-INF/services目录下创建一个以服务接口全限定名为名字的文件,文件中包含实现该服务接口的类的全限定名。当应用程序启动时,Java 的 SPI 机制会自动扫描 classpath 中的这些文件,并根据文件中指定的类名来加载实现类。 - 通过使用 SPI,应用程序可以实现更灵活、可扩展的架构,同时也可以避免硬编码依赖关系和增加代码的可维护性。
从 Spring Boot 2.7 开始,推荐使用
@AutoConfiguration注解和META-INF/spring/org.springframework.boot.autoconfigure.AutoConfiguration.imports文件来定义自动配置类,而不是使用 spring.factories。
例子
写一个比较简单的例子
应用关注的三大核心:场景、配置、组件
my.app.id=1
my.app.app-name=TokenTalk
2
//配置
@ConfigurationProperties(prefix = "my.app")
@Data
public class MyAppProperties {
    private Integer id;
    private String appName;
}
2
3
4
5
6
7
public class MyApp {
    private final MyAppProperties myAppProperties;
    public MyApp(MyAppProperties myAppProperties) {
        this.myAppProperties = myAppProperties;
    }
    public void show() {
        System.out.println(myAppProperties);
    }
}
2
3
4
5
6
7
8
9
@AutoConfiguration
@EnableConfigurationProperties(MyAppProperties.class)
public class MyAppAutoConfiguration {

    //组件,当应用启动MyApp已经被放入到spring容器中了,可以通过@Autowried或者其他的方式注入使用
    @Bean
    public MyApp myApp(MyAppProperties myAppProperties){
        return new MyApp(myAppProperties);
    }
}
2
3
4
5
6
7
8
9
10
//SPI文件
org.example.springboot3.learn.config.MyAppAutoConfiguration
2
# 功能开关
自动配置:全部都配置好,什么都不用管。 自动批量导入
- 项目一启动,spi 文件中指定的所有都加载。
@EnableXxxx:手动控制哪些功能的开启; 手动导入。- 开启 xxx 功能
- 都是利用 @Import 把此功能要用的组件导入进去
# 进阶理解
# @SpringBootApplication
@SpringBootConfiguration:就是 @Configuration ,容器中的组件,配置类。spring ioc 启动就会加载创建这个类对象
@EnableAutoConfiguration:开启自动配置
@AutoConfigurationPackage:扫描主程序包:加载自己的组件
- 利用
@Import(AutoConfigurationPackages.Registrar.class)想要给容器中导入组件。 - 把主程序所在的包的所有组件导入进来。
- 为什么 SpringBoot 默认只扫描主程序所在的包及其子包
static class Registrar implements ImportBeanDefinitionRegistrar, DeterminableImports {
    @Override
    public void registerBeanDefinitions(AnnotationMetadata metadata, BeanDefinitionRegistry registry) {
        //这里的new PackageImports(metadata).getPackageNames().toArray(new String[0])获取到的就是启动类所在的包路径
        register(registry, new PackageImports(metadata).getPackageNames().toArray(new String[0]));
    }
}
2
3
4
5
6
7
@Import(AutoConfigurationImportSelector.class):加载所有自动配置类:加载 starter 导入的组件
protected AutoConfigurationEntry getAutoConfigurationEntry(AnnotationMetadata annotationMetadata) {
    if (!isEnabled(annotationMetadata)) {
        return EMPTY_ENTRY;
    }
    AnnotationAttributes attributes = getAttributes(annotationMetadata);
    //在这里获取到了META-INF/spring/org.springframework.boot.autoconfigure.AutoConfiguration.imports中的配置项
    List<String> configurations = getCandidateConfigurations(annotationMetadata, attributes);
    configurations = removeDuplicates(configurations);
    Set<String> exclusions = getExclusions(annotationMetadata, attributes);
    checkExcludedClasses(configurations, exclusions);
    configurations.removeAll(exclusions);
    configurations = getConfigurationClassFilter().filter(configurations);
    fireAutoConfigurationImportEvents(configurations, exclusions);
    return new AutoConfigurationEntry(configurations, exclusions);
}
2
3
4
5
6
7
8
9
10
11
12
13
14
15
@ComponentScan
组件扫描:排除一些组件(哪些不要)
排除前面已经扫描进来的 配置类 、和 自动配置类 。
@ComponentScan(excludeFilters = { @Filter(type = FilterType.CUSTOM, classes = TypeExcludeFilter.class),
      @Filter(type = FilterType.CUSTOM, classes = AutoConfigurationExcludeFilter.class) })
2
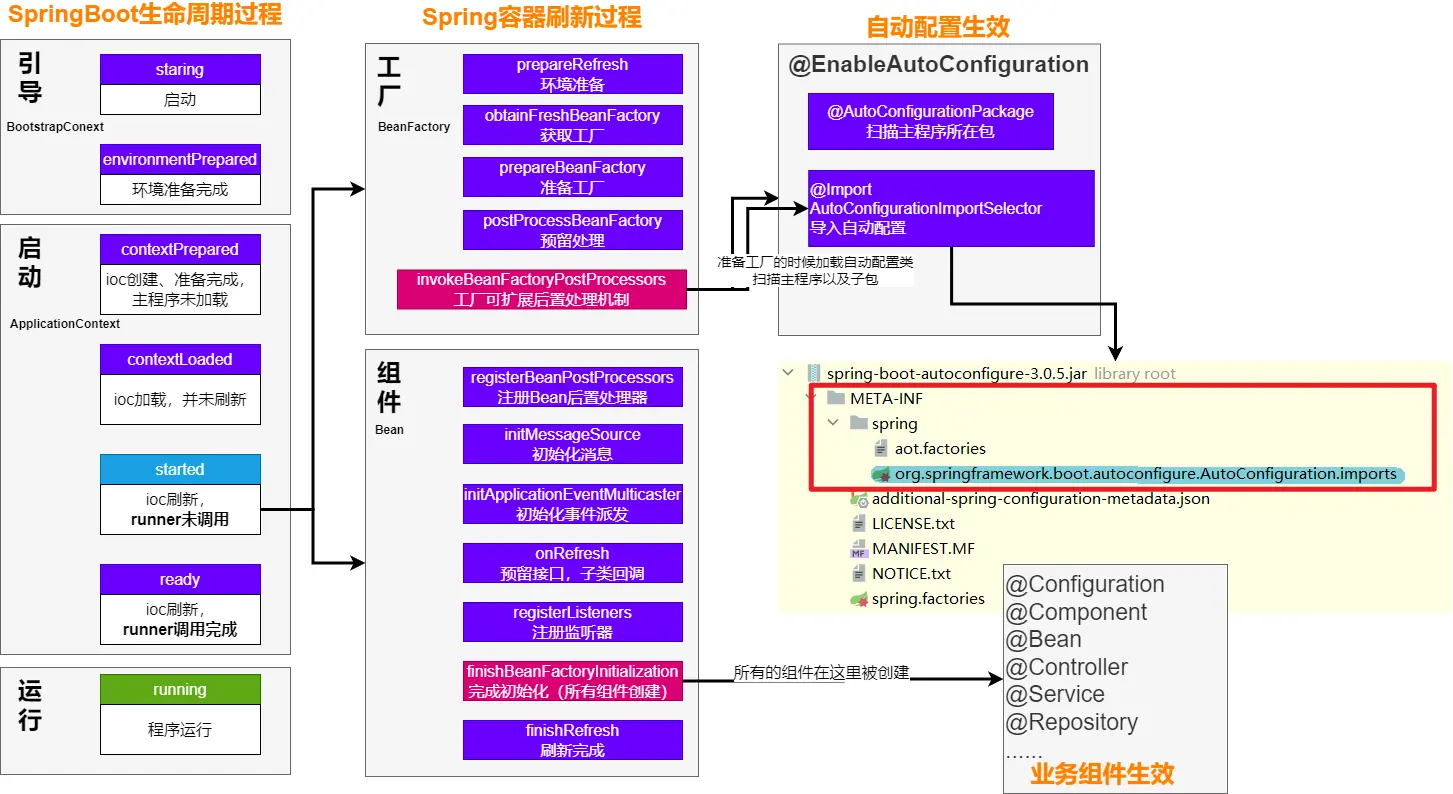
# 完整启动加载流程
生命周期启动加载流程
# 自定义 starter
要求:抽取聊天机器人场景,它可以打招呼。
效果:任何项目导入此 starter 都具有打招呼功能,并且问候语中的人名需要可以在配置文件中修改
- 创建
自定义starter项目,引入spring-boot-starter基础依赖 - 编写模块功能,引入模块所有需要的依赖。
- 编写
xxxAutoConfiguration自动配置类,帮其他项目导入这个模块需要的所有组件 - 编写配置文件
META-INF/spring/org.springframework.boot.autoconfigure.AutoConfiguration.imports指定启动需要加载的自动配置 - 其他项目引入即可使用
例子:以微信和 QQ 聊天机器人为例,写一个简单的例子
//属性绑定
@ConfigurationProperties(prefix = "chat")
@Data
public class ChatProperties {
    private String type;
    private Long ClientId;
    private String ClientKey;
    private String Token;
}
2
3
4
5
6
7
8
9
/**
 * 聊天接口,所有机器人必须实现此方法做出回复
 */
public interface ChatbotService {
    String chat();
}
2
3
4
5
6
public class QqChatServiceImpl implements ChatbotService {
    private final ChatProperties chatProperties;

    public QqChatServiceImpl(ChatProperties chatProperties) {
        this.chatProperties = chatProperties;
    }

    @Override
    public String chat() {
        return "QQ机器人说话了" + chatProperties.getClientId() + chatProperties.getClientKey() + chatProperties.getToken();
    }
}
2
3
4
5
6
7
8
9
10
11
12
public class WxChatServiceImpl implements ChatbotService {
    private final ChatProperties chatProperties;

    public WxChatServiceImpl(ChatProperties chatProperties) {
        this.chatProperties = chatProperties;
    }
    @Override
    public String chat() {
        return "微信机器人说话了" + chatProperties.getClientId() + chatProperties.getClientKey() + chatProperties.getToken();
    }
}
2
3
4
5
6
7
8
9
10
11
/**
 * 微信聊天机器人
 */
@ConditionalOnProperty(name = "chat.type", havingValue = "wx")
@EnableConfigurationProperties(value = ChatProperties.class)
public class WxChatBot {
    @Bean("wxChat")
    public ChatbotService chatbotService(ChatProperties properties) {
        return new WxChatServiceImpl(properties);
    }
}
2
3
4
5
6
7
8
9
10
11
/**
 * QQ聊天机器人
 */
@ConditionalOnProperty(name = "chat.type", havingValue = "qq")
@EnableConfigurationProperties(value = ChatProperties.class)
public class QqChatBot {
    @Bean("qqChat")
    public ChatbotService chatbotService(ChatProperties properties) {
        return new QqChatServiceImpl(properties);
    }
}
2
3
4
5
6
7
8
9
10
11
/**
 * 导入组件
 */
@Configuration
@Import({WxChatBot.class, QqChatBot.class})
public class ChatbotAutoConfiguration {
}
2
3
4
5
6
7
## qq
chat.type=wx
chat.client-id=1
chat.client-key=DTqarV6BZtJLP4UaJnst5fxCDRS4O5qe
chat.token=BR0siR5oknN4Crof352CErKTTdIjLGPFQv9ekFiHDI8Af6Lvh216IMomT1i7s8WV
2
3
4
5
//SPI
org.example.springboot3.learn.config.ChatbotAutoConfiguration
2
可以将上面 ChatbotAutoConfiguration 代码进行打包,然后将其业务代码另行封装,当其他项目引入依赖的时候,就会根据配置 qq 或者 wx 自动注入对应的组件