
 Redis 主从复制
# 是什么
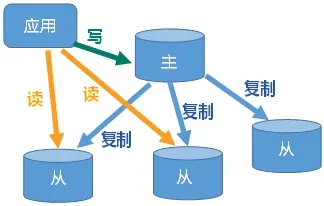
主机数据更新后根据配置和策略, 自动同步到备机的 master/slaver 机制,Master 以写为主,Slave 以读为主。
# 能干嘛
- 读写分离,性能扩展
- 容灾快速恢复
# 安装
- 拷贝多个 redis.conf 文件 include (写绝对路径)
- 开启 daemonize yes
- Pid 文件名字 pidfile
- 指定端口 port
- Log 文件名字
- dump.rdb 名字 dbfilename
- Appendonly 关掉或者换名字
# 新建 redis6379.conf,填写以下内容
include /root/myredis/redis.conf
pidfile /var/run/redis_6379.pid
port 6379
dbfilename dump6379.rdb
2
3
4
# 新建 redis6380.conf,填写以下内容
include /root/myredis/redis.conf
pidfile /var/run/redis_6380.pid
port 6380
dbfilename dump6380.rdb
slave-priority 10
slaveof 127.0.0.1 6379
2
3
4
5
6
# 新建 redis6381.conf,填写以下内容
include /root/myredis/redis.conf
pidfile /var/run/redis_6381.pid
port 6381
dbfilename dump6381.rdb
slaveof 127.0.0.1 6379
2
3
4
5
slave-priority 10
设置从机的优先级,值越小,优先级越高,用于选举主机时使用。默认 100
# 启动三台 Redis 服务器
redis-server ~/myredis/redis6379.conf
redis-server ~/myredis/redis6380.conf
redis-server ~/myredis/redis6381.conf
2
3
# 查看系统进程

# 查看三台主机运行情况
info replication :打印主从复制的相关信息。
# 配从 (库) 不配主 (库 **)**
slaveof <ip> <port> :成为某个实例的从服务器。
- 在 6380 和 6381 上执行:
slaveof 127.0.0.1 6379 - 在主机上写,在从机上可以读取数据,无法写入

- 主机挂掉,重启就行,一切如初。
- 从机重启需重设:
slaveof 127.0.0.1 6379
可以将配置增加到文件中。永久生效。
# 安装(Docker)
目录结构如下
.
├── docker-compose.yml
├── master
│   ├── conf
│   │   └── redis.conf
│   ├── data
│   └── logs
├── sentinel
│   ├── sentinel-1
│   │   ├── conf
│   │   │   └── sentinel.conf
│   │   └── data
│   ├── sentinel-2
│   │   ├── conf
│   │   │   └── sentinel.conf
│   │   └── data
│   └── sentinel-3
│       ├── conf
│       │   └── sentinel.conf
│       └── data
├── slave1
│   ├── conf
│   │   └── redis.conf
│   ├── data
│   └── logs
└── slave2
    ├── conf
    │   └── redis.conf
    ├── data
    └── logs
2
3
4
5
6
7
8
9
10
11
12
13
14
15
16
17
18
19
20
21
22
23
24
25
26
27
28
29
30
version: "3.8"

services:
  master:
    image: redis:7.0.5
    container_name: redis-master
    hostname: redis-master
    restart: always
    volumes:
      - ./master/data:/data
      - ./master/conf/redis.conf:/etc/redis/redis.conf
      - ./master/logs:/logs
    ports:
      - 6379:6379
### 这里的slave-announce-ip、slave-announce-port是宿主机IP与端口,不设置的话哨兵模式下访问的是容器内IP端口,不能为外部应用提供服务,原因是由于端口或IP映射导致的无法连接的问题。例如 docker 这种容器,当你使用了端口映射后,运行在 docker 中的 redis 是不知道正真的端口或 IP 的,所以在哨兵模式下,哨兵就无法连接到 master 和 replica。当遇到这种情况后,其实还有另一种解决方式,就是直接使用 docker 的主机网络(启动时加上 --net=host)。
    command: ["redis-server","/etc/redis/redis.conf","--masterauth 111111","--slave-announce-ip 192.168.25.10","--slave-announce-port 6379"]

  slave1:
    image: redis:7.0.5
    container_name: redis-slave-1
    hostname: redis-slave-1
    restart: always
    volumes:
      - ./slave1/data:/data
      - ./slave1/conf/redis.conf:/etc/redis/redis.conf
      - ./slave1/logs:/logs
    ports:
      - 6380:6380
    command: ["redis-server","/etc/redis/redis.conf","--slaveof 192.168.25.10 6379","--masterauth 111111","--slave-announce-ip 192.168.25.10","--slave-announce-port 6380"]
    depends_on:
      - master

  slave2:
    image: redis:7.0.5
    container_name: redis-slave-2
    hostname: redis-slave-2
    restart: always
    volumes:
      - ./slave2/data:/data
      - ./slave2/conf/redis.conf:/etc/redis/redis.conf
      - ./slave2/logs:/logs
    ports:
      - 6381:6381
    command: ["redis-server","/etc/redis/redis.conf","--slaveof 192.168.25.10 6379","--masterauth 111111","--slave-announce-ip 192.168.25.10","--slave-announce-port 6381"]
    depends_on:
      - master

  redis-sentinel-1:
    image: redis:7.0.5
    container_name: redis-sentinel-1
    restart: always
    ports:
      - 26379:26379
    volumes:
      # - ./sentinel-1/data:/data
      - ./sentinel/sentinel-1/conf/sentinel.conf:/usr/local/etc/redis/sentinel.conf
    command: ["redis-sentinel","/usr/local/etc/redis/sentinel.conf"]
    depends_on:
      - master
      - slave1
      - slave2
  redis-sentinel-2:
    image: redis:7.0.5
    container_name: redis-sentinel-2
    restart: always
    ports:
      - 26380:26380
    volumes:
      # - ./sentinel-2/data:/data
      - ./sentinel/sentinel-2/conf/sentinel.conf:/usr/local/etc/redis/sentinel.conf
    command: ["redis-sentinel","/usr/local/etc/redis/sentinel.conf"]
    depends_on:
      - master
      - slave1
      - slave2

  redis-sentinel-3:
    image: redis:7.0.5
    container_name: redis-sentinel-3
    restart: always
    ports:
      - 26381:26381
    volumes:
      # - ./sentinel-3/data:/data
      - ./sentinel/sentinel-3/conf/sentinel.conf:/usr/local/etc/redis/sentinel.conf
    command: ["redis-sentinel","/usr/local/etc/redis/sentinel.conf"]
    depends_on:
      - master
      - slave1
      - slave2
2
3
4
5
6
7
8
9
10
11
12
13
14
15
16
17
18
19
20
21
22
23
24
25
26
27
28
29
30
31
32
33
34
35
36
37
38
39
40
41
42
43
44
45
46
47
48
49
50
51
52
53
54
55
56
57
58
59
60
61
62
63
64
65
66
67
68
69
70
71
72
73
74
75
76
77
78
79
80
81
82
83
84
85
86
87
88
89
90
#redis.conf
###看清配置项母,牵扯到端口或者IP的请自行修改
#允许外部访问
bind 0.0.0.0
protected-mode yes
#端口
port 6380
tcp-backlog 511
timeout 0
tcp-keepalive 300
daemonize no
pidfile /var/run/redis_6380.pid
loglevel notice
logfile ""
databases 16
always-show-logo no
set-proc-title yes
proc-title-template "{title} {listen-addr} {server-mode}"
stop-writes-on-bgsave-error yes
rdbcompression yes
rdbchecksum yes
dbfilename dump.rdb
rdb-del-sync-files no
dir ./
replica-serve-stale-data yes
replica-read-only yes
repl-diskless-sync yes
repl-diskless-sync-delay 5
repl-diskless-sync-max-replicas 0
repl-diskless-load disabled
repl-disable-tcp-nodelay no
replica-priority 100
#指定宿主机的IP和端口
replica-announce-ip 192.168.25.10
replica-announce-port 6380
acllog-max-len 128
#密码
requirepass 111111
lazyfree-lazy-eviction no
lazyfree-lazy-expire no
lazyfree-lazy-server-del no
replica-lazy-flush no
lazyfree-lazy-user-del no
lazyfree-lazy-user-flush no
oom-score-adj no
oom-score-adj-values 0 200 800
disable-thp yes
#RDB持久化
#只在Slave上持久化RDB文件,而且只要15分钟备份一次就够了
save 900 1
#AOF持久化
appendonly yes
appendfilename "appendonly.aof"
appenddirname "appendonlydir"

appendfsync everysec
no-appendfsync-on-rewrite no
auto-aof-rewrite-percentage 100
auto-aof-rewrite-min-size 64mb
aof-load-truncated yes
aof-use-rdb-preamble yes
aof-timestamp-enabled no
slowlog-log-slower-than 10000
slowlog-max-len 128
latency-monitor-threshold 0
notify-keyspace-events ""
hash-max-listpack-entries 512
hash-max-listpack-value 64
list-max-listpack-size -2
list-compress-depth 0
set-max-intset-entries 512
zset-max-listpack-entries 128
zset-max-listpack-value 64
hll-sparse-max-bytes 3000
stream-node-max-bytes 4096
stream-node-max-entries 100
activerehashing yes
client-output-buffer-limit normal 0 0 0
client-output-buffer-limit replica 256mb 64mb 60
client-output-buffer-limit pubsub 32mb 8mb 60
hz 10
dynamic-hz yes
aof-rewrite-incremental-fsync yes
rdb-save-incremental-fsync yes
jemalloc-bg-thread yes
2
3
4
5
6
7
8
9
10
11
12
13
14
15
16
17
18
19
20
21
22
23
24
25
26
27
28
29
30
31
32
33
34
35
36
37
38
39
40
41
42
43
44
45
46
47
48
49
50
51
52
53
54
55
56
57
58
59
60
61
62
63
64
65
66
67
68
69
70
71
72
73
74
75
76
77
78
79
80
81
82
83
84
85
# sentinel.conf
####  根据Docker配置修改端口号或者IP####
#哨兵的端口
port 26379
#工作路径
dir "/data"

protected-mode no

# 指明日志文件名,一旦开启需要修改Docker配置中的映射地址,开启后docker中无日志,日在data文件夹中
# logfile "/data/sentinel.log"

# master表示 哨兵监控master服务的别名
# 192.168.25.10 表示 master地址
#2 表示只需要2个sentinel投票即可故障转移
sentinel monitor mymaster 192.168.25.10 6379 2

#这两项配置非常重要,不同哨兵的节点通信的地址
sentinel announce-ip 192.168.25.10
sentinel announce-port 26379

# 用于验证主节点和副本的密码
sentinel auth-pass mymaster 111111

sentinel down-after-milliseconds mymaster 30000
sentinel parallel-syncs mymaster 1
sentinel failover-timeout mymaster 180000
sentinel deny-scripts-reconfig yes
2
3
4
5
6
7
8
9
10
11
12
13
14
15
16
17
18
19
20
21
22
23
24
25
26
27
28
# 常用 3 招
# 一主二仆
- 切入点问题?slave1、slave2 是从头开始复制还是从切入点开始复制?比如从 k4 进来,那之前的 k1,k2,k3 是否也可以复制?从机是否可以写?set 可否?
- 能复制。
- 不可
主机 shutdown 后情况如何?从机是上位还是原地待命?
主机又回来了后,主机新增记录,从机还能否顺利复制?
其中一台从机 down 后情况如何?依照原有它能跟上大部队吗?

# 薪火相传
上一个 Slave 可以是下一个 slave 的 Master,Slave 同样可以接收其他 slaves 的连接和同步请求,那么该 slave 作为了链条中下一个的 master,可以有效减轻 master 的写压力,去中心化降低风险。
用 slaveof <ip> <port>
中途变更转向:会清除之前的数据,重新建立拷贝最新的。
风险是一旦某个 slave 宕机,后面的 slave 都没法备份。主机挂了,从机还是从机,无法写数据了。

# 反客为主
当一个 master 宕机后,后面的 slave 可以立刻升为 master,其后面的 slave 不用做任何修改。

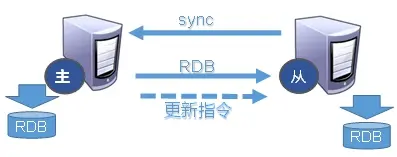
# 复制原理
- Slave 启动成功连接到 master 后会发送一个 sync 命令。
- Master 接到命令启动后台的存盘进程,同时收集所有接收到的用于修改数据集命令, 在后台进程执行完毕之后,master 将传送整个数据文件到 slave,以完成一次完全同步。
- 全量复制:而 slave 服务在接收到数据库文件数据后,将其存盘并加载到内存中。
- 增量复制:Master 继续将新的所有收集到的修改命令依次传给 slave,完成同步。
- 但是只要是重新连接 master,一次完全同步(全量复制)将被自动执行。
# 哨兵模式(sentinel)
# 是什么
反客为主的自动版,能够后台监控主机是否故障,如果故障了根据投票数自动将从库转换为主库。

# 使用步骤
调整为一主二仆模式,6379 带着 6380、6381。
自定义的 myredis 目录下新建 sentinel.conf 文件,名字绝不能错。
配置哨兵,填写内容。
sentinel monitor mymaster 127.0.0.1 6379 1
#其中mymaster为监控对象起的服务器名称, 1 为至少有多少个哨兵同意迁移的数量。
1
2启动哨兵
/usr/local/bin/redis-sentinel ~/myredis/sentinel.conf1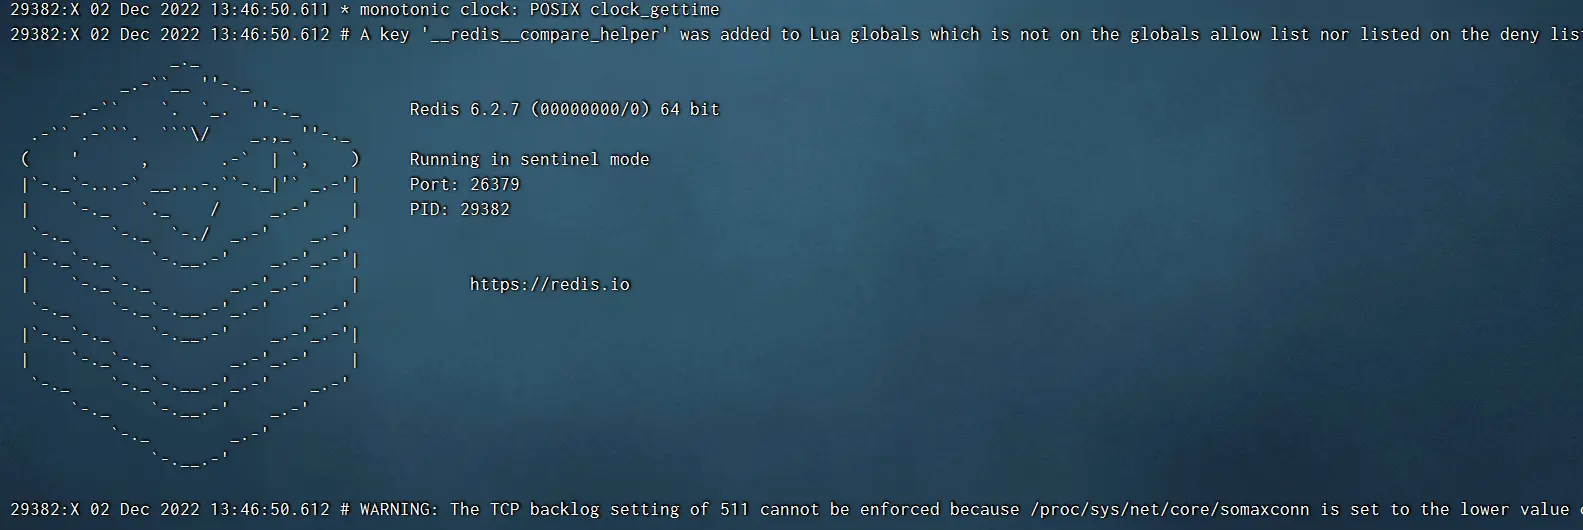
当主机挂掉,从机选举中产生新的主机 (大概 10 秒左右可以看到哨兵窗口日志,切换了新的主机),哪个从机会被选举为主机呢?根据优先级别:slave-priority ,原主机重启后会变为从机。

通过图形化工具连接 26379 端口即可访问 sentinel
# 复制延时
由于所有的写操作都是先在 Master 上操作,然后同步更新到 Slave 上,所以从 Master 同步到 Slave 机器有一定的延迟,当系统很繁忙的时候,延迟问题会更加严重,Slave 机器数量的增加也会使这个问题更加严重。
# 故障恢复
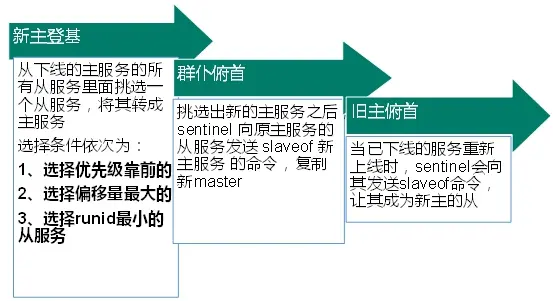
优先级在 redis.conf 中默认:slave-priority 100,值越小优先级越高,偏移量是指获得原主机数据最全的,每个 redis 实例启动后都会随机生成一个 40 位的 runid。
# 代码修改
// 在修改代码之前需要将sentinel.conf中的IP修改为真实IP,sentinel monitor mymaster 192.168.25.100 6381 1
// 否则会一直抛出Reason: redis.clients.jedis.exceptions.JedisConnectionException
public class SentinelJedisPool {

    private static JedisSentinelPool pool = null;

    //可用连接实例的最大数目,默认为8;
    //如果赋值为-1,则表示不限制,如果pool已经分配了maxActive个jedis实例,则此时pool的状态为exhausted(耗尽)
    private static Integer MAX_TOTAL = 1024;
    //控制一个pool最多有多少个状态为idle(空闲)的jedis实例,默认值是8
    private static Integer MAX_IDLE = 200;
    //等待可用连接的最大时间,单位是毫秒,默认值为-1,表示永不超时。
    //如果超过等待时间,则直接抛出JedisConnectionException
    private static Integer MAX_WAIT_MILLIS = 10000;
    //客户端超时时间配置
    private static Integer TIMEOUT = 10000;
    //在borrow(用)一个jedis实例时,是否提前进行validate(验证)操作;
    //如果为true,则得到的jedis实例均是可用的
    private static Boolean TEST_ON_BORROW = true;
    //在空闲时检查有效性, 默认false
    private static Boolean TEST_WHILE_IDLE = true;
    //是否进行有效性检查
    private static Boolean TEST_ON_RETURN = true;

    /**
     * 创建连接池
     */
    private static void createJedisPool() {
        JedisPoolConfig config = new JedisPoolConfig();
        /*注意:
            在高版本的jedis jar包,比如本版本2.9.0,JedisPoolConfig没有setMaxActive和setMaxWait属性了
            这是因为高版本中官方废弃了此方法,用以下两个属性替换。
            maxActive  ==>  maxTotal
            maxWait==>  maxWaitMillis
         */
        config.setMaxTotal(MAX_TOTAL);
        config.setMaxIdle(MAX_IDLE);
        config.setMaxWaitMillis(MAX_WAIT_MILLIS);
        config.setTestOnBorrow(TEST_ON_BORROW);
        config.setTestWhileIdle(TEST_WHILE_IDLE);
        config.setTestOnReturn(TEST_ON_RETURN);
        String masterName = "mymaster";
        Set<String> sentinels = new HashSet<String>();
        sentinels.add(new HostAndPort("192.168.25.100", 26379).toString());
//        String password = "1234@abcd";
//        pool = new JedisSentinelPool(masterName, sentinels, config, TIMEOUT,password);
        pool = new JedisSentinelPool(masterName, sentinels, config, TIMEOUT);
    }

    private static synchronized void poolInit() {
        if (pool == null)
            createJedisPool();
    }


    /**
     * 获取一个redis对象
     * @return
     */
    public static Jedis getJedis() {
        if (pool == null)
            poolInit();
        return pool.getResource();
    }

}
2
3
4
5
6
7
8
9
10
11
12
13
14
15
16
17
18
19
20
21
22
23
24
25
26
27
28
29
30
31
32
33
34
35
36
37
38
39
40
41
42
43
44
45
46
47
48
49
50
51
52
53
54
55
56
57
58
59
60
61
62
63
64
65
66