
 Shiro 基本使用
欢迎来到我的 ChatGPT 中转站,极具性价比,为付费不方便的朋友提供便利,有需求的可以添加左侧 QQ 二维码,另外,邀请新用户能获取余额哦!最后说一句,那啥:请自觉遵守《生成式人工智能服务管理暂行办法》。
# 环境准备
- shiro 不依赖容器,直接创建 maven 工程即可。
- 环境搭建
<!-- pom.xml -->
<?xml version="1.0" encoding="UTF-8"?>

<project xmlns:xsi="http://www.w3.org/2001/XMLSchema-instance" xmlns="http://maven.apache.org/POM/4.0.0"
         xsi:schemaLocation="http://maven.apache.org/POM/4.0.0 http://maven.apache.org/xsd/maven-4.0.0.xsd">
    <modelVersion>4.0.0</modelVersion>

    <groupId>org.example</groupId>
    <artifactId>shiro-demo</artifactId>
    <version>1.0-SNAPSHOT</version>

    <name>shiro-demo</name>
    <url>http://www.example.com</url>

    <packaging>jar</packaging>

    <properties>
        <project.build.sourceEncoding>UTF-8</project.build.sourceEncoding>
    </properties>

    <build>
        <plugins>
            <plugin>
                <groupId>org.apache.maven.plugins</groupId>
                <artifactId>maven-compiler-plugin</artifactId>
                <version>3.8.0</version>
                <configuration>
                    <source>1.8</source>
                    <target>1.8</target>
                </configuration>
            </plugin>

            <!-- This plugin is only to test run our little application.  It is not
                 needed in most Shiro-enabled applications: -->
            <plugin>
                <groupId>org.codehaus.mojo</groupId>
                <artifactId>exec-maven-plugin</artifactId>
                <version>1.1</version>
                <executions>
                    <execution>
                        <goals>
                            <goal>java</goal>
                        </goals>
                    </execution>
                </executions>
                <configuration>
                    <classpathScope>test</classpathScope>
                    <mainClass>Tutorial</mainClass>
                </configuration>
            </plugin>
        </plugins>
    </build>

    <dependencies>
        <dependency>
            <groupId>org.apache.shiro</groupId>
            <artifactId>shiro-core</artifactId>
            <version>1.10.1</version>
        </dependency>
        <dependency>
            <groupId>org.slf4j</groupId>
            <artifactId>slf4j-log4j12</artifactId>
            <version>1.7.12</version>
        </dependency>
        <dependency>
            <groupId>commons-logging</groupId>
            <artifactId>commons-logging</artifactId>
            <version>1.2</version>
        </dependency>
    </dependencies>

</project>
1
2
3
4
5
6
7
8
9
10
11
12
13
14
15
16
17
18
19
20
21
22
23
24
25
26
27
28
29
30
31
32
33
34
35
36
37
38
39
40
41
42
43
44
45
46
47
48
49
50
51
52
53
54
55
56
57
58
59
60
61
62
63
64
65
66
67
68
69
70
71
72
2
3
4
5
6
7
8
9
10
11
12
13
14
15
16
17
18
19
20
21
22
23
24
25
26
27
28
29
30
31
32
33
34
35
36
37
38
39
40
41
42
43
44
45
46
47
48
49
50
51
52
53
54
55
56
57
58
59
60
61
62
63
64
65
66
67
68
69
70
71
72
#log4j.properties
############# 日志输出到控制台 #############
# 通过根元素指定日志输出的级别、目的地
# 日志输出的优先级:  debug < info < warn < error
log4j.rootLogger=INFO,CONSOLE
# 日志输出到控制台使用的api类
log4j.appender.CONSOLE = org.apache.log4j.ConsoleAppender
log4j.appender.CONSOLE.Target = System.out
log4j.appender.CONSOLE.layout = org.apache.log4j.PatternLayout
log4j.appender.CONSOLE.layout.ConversionPattern=%d %p %c.%M()-%m%n
1
2
3
4
5
6
7
8
9
10
2
3
4
5
6
7
8
9
10
# INI 文件
Shiro 获取权限相关信息可以通过数据库获取,也可以通过 ini 配置文件获取。
1、在 resource 创建 INI 文件
# -----------------------------------------------------------------------------
# Users and their (optional) assigned roles
# username = password, role1, role2, ..., roleN
# -----------------------------------------------------------------------------
[users]
root = root
guest = guest
1
2
3
4
5
6
7
2
3
4
5
6
7
# 登录认证
# 登录认证概念
- 身份验证:一般需要提供如身份 ID 等一些标识信息来表明登录者的身份,如提供 email,用户名 / 密码来证明。
- 在 shiro 中,用户需要提供 principals(身份)和 credentials(证明)给 shiro,从而应用能验证用户身份。
- principals:身份,即主体的标识属性,可以是任何属性,如用户名、邮箱等,唯一即可。一个主体可以有多个 principals,但只有一个 Primary principals,一般是用户名 / 邮箱 / 手机号。
- credentials:证明 / 凭证,即只有主体知道的安全值,如密码 / 数字证书等。
- 最常见的 principals 和 credentials 组合就是用户名 / 密码。
# 登录认证基本流程
- 收集用户身份 / 凭证,即如用户名 / 密码。
- 调用 Subject.login 进行登录,如果失败将得到相应 的 AuthenticationException 异常,根据异常提示用户 错误信息;否则登录成功。
- 创建自定义的 Realm 类,继承 org.apache.shiro.realm.AuthenticatingRealm 类, 实现 doGetAuthenticationInfo () 方法。
# 登录认证实例
创建测试类,获取认证对象,进行登录认证,如下:
public class Tutorial {
    private static final Logger log = LoggerFactory.getLogger(Tutorial.class);

    public static void main(String[] args) {
        log.info("My First Apache Shiro Application");
        Environment environment = new BasicIniEnvironment("classpath:shiro.ini");
        SecurityManager securityManager = environment.getSecurityManager();
        //这种方式Shiro已经弃用
        // Factory<SecurityManager> factory = new IniSecurityManagerFactory("classpath:shiro.ini");
        // SecurityManager securityManager = factory.getInstance();
        SecurityUtils.setSecurityManager(securityManager);
        //获取 Subject 对象
        Subject subject = SecurityUtils.getSubject();
        //完成登录
        if (!subject.isAuthenticated()) {
            //创建 token 对象,web 应用用户名密码从页面传递
            UsernamePasswordToken token = new UsernamePasswordToken("root", "root");
            //记住我
            token.setRememberMe(true);
            try {
                subject.login(token);
            } catch (UnknownAccountException e) {
                e.printStackTrace();
                log.error("用户不存在!");
                System.out.println("用户不存在");
            } catch (IncorrectCredentialsException e) {
                e.printStackTrace();
                log.error("密码错误!");
            } catch (AuthenticationException ae) {
                //unexpected condition? error?
            }
        }
    }
}
1
2
3
4
5
6
7
8
9
10
11
12
13
14
15
16
17
18
19
20
21
22
23
24
25
26
27
28
29
30
31
32
33
34
2
3
4
5
6
7
8
9
10
11
12
13
14
15
16
17
18
19
20
21
22
23
24
25
26
27
28
29
30
31
32
33
34
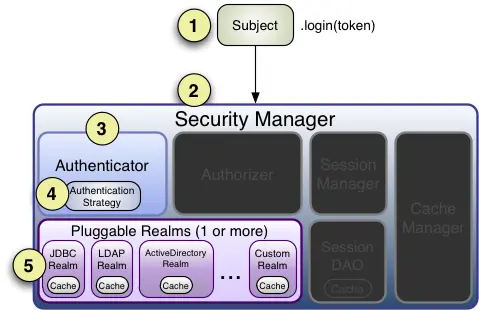
# 身份认证流程
- 首先调用 Subject.login(token) 进行登录,其会自动委托给 SecurityManager。
- SecurityManager 负责真正的身份验证逻辑;它会委托给 Authenticator 进行身份验证。
- Authenticator 才是真正的身份验证者,Shiro API 中核心的身份 认证入口点,此 处可以自定义插入自己的实现。
- Authenticator 可能会委托给相应的 AuthenticationStrategy 进 行多 Realm 身份 验证,默认 ModularRealmAuthenticator 会调用 AuthenticationStrategy 进行多 Realm 身份验证。
- Authenticator 会把相应的 token 传入 Realm,从 Realm 获取 身份验证信息,如 果没有返回 / 抛出异常表示身份验证失败了。此处 可以配置多个 Realm,将按照相应的顺序 及策略进行访问。
# 角色、授权
# 授权概念
- 授权:也叫访问控制,即在应用中控制谁访问哪些资源(如访问页面 / 编辑数据 / 页面操作等)。在授权中需了解的几个关键对象:主体(Subject)、资源(Resource)、权 限 (Permission)、角色(Role)。
- 主体 (Subject):访问应用的用户,在 Shiro 中使用 Subject 代表该用户。用户只有授权后才允许访问相应的资源。
- 资源 (Resource):在应用中用户可以访问的 URL,比如访问 JSP 页面、查看 / 编辑 某些 数据、访问某个业务方法、打印文本等等都是资源。用户只要授权后才能访问。
- 权限 (Permission):安全策略中的原子授权单位,通过权限我们可以表示在应用中用户有没有操作某个资源的权力。即权限表示在应用中用户能不能访问某个资源,如:** 访问用户列表页面查看 / 新增 / 修改 / 删除用户数据(即很多时候都是 CRUD(增查改删)式权限控制)** 等。权限代表了用户有没有操作某个资源的权利,即反映在某个资源上的操作允不允许。
- Shiro 支持粗粒度权限(如用户模块的所有权限)和细粒度权限(操作某个用户的权 限, 即实例级别的)。
- 角色 (Role):权限的集合,一般情况下会赋予用户角色而不是权限,即这样用户可以拥有一组权限,赋予权限时比较方便。典型的如:项目经理、技术总监、CTO、开发工程师等都是角色,不同的角色拥有一组不同的权限。
# 授权方式
编程式:通过写 if/else 授权代码块完成
if(subject.hasRole("admin")){
    //有权限
}else{
    //无权限
}
1
2
3
4
5注解式:通过在执行的 Java 方法上放置相应的注解完成,没有权限将抛出相应的异常。
@RequiresRoles("admin")
public void hello(){
    //有权限
}
1
2
3
4JSP/GSP 标签:在 JSP/GSP 页面通过相应的标签完成。
<shiro:hasRole name="admin">
    <!--有权限-->
</shiro:hasRole>
1
2
3
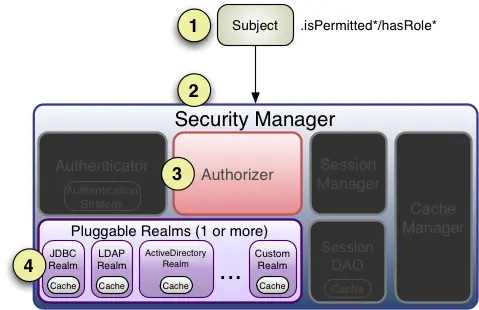
# 授权流程
- 首先调用 Subject.isPermitted*/hasRole * 接口,其会委托给 SecurityManager,而 SecurityManager 接着会委托给 Authorizer。
- Authorizer 是真正的授权者,如果调用如 isPermitted (“user:view”),其首先会通过 PermissionResolver 把字符串转换成相应的 Permission 实例。
- 在进行授权之前,其会调用相应的 Realm 获取 Subject 相应的角色 / 权限用于匹配传入的角色 / 权限。
- Authorizer 会判断 Realm 的角色 / 权限是否和传入的匹配,如果有多个 Realm,会委托给 ModularRealmAuthorizer 进行循环判断,如果匹配如 isPermitted*/hasRole * 会返回 true,否则返回 false 表示授权失败。
# 授权实例
获取角色信息
1、给 shiro.ini 增加角色配置
# -----------------------------------------------------------------------------
# Users and their (optional) assigned roles
# username = password, role1, role2, ..., roleN
# -----------------------------------------------------------------------------
[users]
root = root, admin
guest = guest, guest
presidentskroob = 12345, president
darkhelmet = ludicrousspeed, darklord, schwartz
lonestarr = vespa, goodguy, schwartz
1
2
3
4
5
6
7
8
9
10
2
3
4
5
6
7
8
9
10
2、通过 hasRole () 判断是否具有指定的角色
public class Tutorial {
    private static final Logger log = LoggerFactory.getLogger(Tutorial.class);

    public static void main(String[] args) {
        log.info("My First Apache Shiro Application");
        Environment environment = new BasicIniEnvironment("classpath:shiro.ini");
        SecurityManager securityManager = environment.getSecurityManager();
        //这种方式Shiro已经弃用
        // Factory<SecurityManager> factory = new IniSecurityManagerFactory("classpath:shiro.ini");
        // SecurityManager securityManager = factory.getInstance();
        SecurityUtils.setSecurityManager(securityManager);
        //获取 Subject 对象
        Subject subject = SecurityUtils.getSubject();
        //完成登录
        if (!subject.isAuthenticated()) {
            //创建 token 对象,web 应用用户名密码从页面传递
            UsernamePasswordToken token = new UsernamePasswordToken("darkhelmet", "ludicrousspeed");
            //记住我
            token.setRememberMe(true);
            try {
                subject.login(token);
            } catch (UnknownAccountException e) {
                e.printStackTrace();
                log.error("用户不存在!");
                System.out.println("用户不存在");
            } catch (IncorrectCredentialsException e) {
                e.printStackTrace();
                log.error("密码错误!");
            } catch (AuthenticationException ae) {
                //unexpected condition? error?
            }
        }
        log.info("User [" + subject.getPrincipal() + "] 登录成功.");
        if (subject.hasRole("admin")) {
            log.info("欢迎您!管理员。");
        } else {
            log.info("欢迎您!。");
        }
    }
}
1
2
3
4
5
6
7
8
9
10
11
12
13
14
15
16
17
18
19
20
21
22
23
24
25
26
27
28
29
30
31
32
33
34
35
36
37
38
39
40
2
3
4
5
6
7
8
9
10
11
12
13
14
15
16
17
18
19
20
21
22
23
24
25
26
27
28
29
30
31
32
33
34
35
36
37
38
39
40
3、判断权限信息
# -----------------------------------------------------------------------------
# Users and their (optional) assigned roles
# username = password, role1, role2, ..., roleN
# -----------------------------------------------------------------------------
[users]
root = root, admin
guest = guest, guest
presidentskroob = 12345, president
darkhelmet = ludicrousspeed, darklord, schwartz
lonestarr = vespa, goodguy, schwartz

# -----------------------------------------------------------------------------
# Roles with assigned permissions
# roleName = perm1, perm2, ..., permN
# -----------------------------------------------------------------------------
[roles]
admin = *
schwartz = lightsaber:*
goodguy = winnebago:drive:eagle5
1
2
3
4
5
6
7
8
9
10
11
12
13
14
15
16
17
18
19
2
3
4
5
6
7
8
9
10
11
12
13
14
15
16
17
18
19
public class Tutorial {
    private static final Logger log = LoggerFactory.getLogger(Tutorial.class);

    public static void main(String[] args) {
        log.info("My First Apache Shiro Application");
        Environment environment = new BasicIniEnvironment("classpath:shiro.ini");
        SecurityManager securityManager = environment.getSecurityManager();
        //这种方式Shiro已经弃用
        // Factory<SecurityManager> factory = new IniSecurityManagerFactory("classpath:shiro.ini");
        // SecurityManager securityManager = factory.getInstance();
        SecurityUtils.setSecurityManager(securityManager);
        //获取 Subject 对象
        Subject subject = SecurityUtils.getSubject();
        //完成登录
        if (!subject.isAuthenticated()) {
            //创建 token 对象,web 应用用户名密码从页面传递
            UsernamePasswordToken token = new UsernamePasswordToken("darkhelmet", "ludicrousspeed");
            //记住我
            token.setRememberMe(true);
            try {
                subject.login(token);
            } catch (UnknownAccountException e) {
                e.printStackTrace();
                log.error("用户不存在!");
                System.out.println("用户不存在");
            } catch (IncorrectCredentialsException e) {
                e.printStackTrace();
                log.error("密码错误!");
            } catch (AuthenticationException ae) {
                //unexpected condition? error?
            }
        }
        log.info("User [" + subject.getPrincipal() + "] 登录成功.");
        if (subject.hasRole("schwartz")) {
            log.info("欢迎您!管理员。");
        } else {
            log.info("欢迎您!。");
        }

        if (subject.isPermitted("lightsaber:wield")) {
            log.info("您可以用光剑戒指。明智地使用它!");
        } else {
            log.info("抱歉,光剑戒指是施瓦兹大师的专利!");
        }
        if (subject.isPermitted("winnebago:drive:eagle5")) {
            log.info("你被允许“驾驶”winnebago的牌照(id)“eagle5”。这是钥匙——玩得开心!");
        } else {
            log.info("抱歉,您不能驾驶winnebago!");
        }
        //退出登录
        subject.logout();
    }
}
1
2
3
4
5
6
7
8
9
10
11
12
13
14
15
16
17
18
19
20
21
22
23
24
25
26
27
28
29
30
31
32
33
34
35
36
37
38
39
40
41
42
43
44
45
46
47
48
49
50
51
52
53
2
3
4
5
6
7
8
9
10
11
12
13
14
15
16
17
18
19
20
21
22
23
24
25
26
27
28
29
30
31
32
33
34
35
36
37
38
39
40
41
42
43
44
45
46
47
48
49
50
51
52
53
# Shiro 加密
实际系统开发中,一些敏感信息需要进行加密,比如说用户的密码。Shiro 内嵌很多常用的加密算法,比如 MD5 加密。Shiro 可以很简单的使用信息加密。
public class ShiroD {
    public static void main(String[] args) {
        //密码明文
        String password = "root";
        //使用 md5 加密
        Md5Hash md5Hash = new Md5Hash(password);
        System.out.println("md5 加密:" + md5Hash.toHex());
        //带盐的 md5 加密,盐就是在密码明文后拼接新字符串,然后再进行加密
        Md5Hash md5Hash2 = new Md5Hash(password, "salt");
        System.out.println("md5 带盐加密:" + md5Hash2.toHex());
        //为了保证安全,避免被破解还可以多次迭代加密,保证数据安全
        Md5Hash md5Hash3 = new Md5Hash(password, "salt", 3);
        System.out.println("md5 带盐三次加密:" + md5Hash3.toHex());
        //使用 sha256 加密
        Sha256Hash hash = new Sha256Hash(password, "salt");
        //使用父类实现加密
        SimpleHash simpleHash = new SimpleHash("MD5", password, "salt", 3);
        System.out.println("父类带盐三次加密:" + simpleHash.toHex());
    }
}
1
2
3
4
5
6
7
8
9
10
11
12
13
14
15
16
17
18
19
20
2
3
4
5
6
7
8
9
10
11
12
13
14
15
16
17
18
19
20
# Shiro 自定义登录认证
Shiro 默认的登录认证是不带加密的,如果想要实现加密认证需要自定义登录认证, 自定义 Realm。
1、自定义登录认证
public class MyRealm extends AuthenticatingRealm {
    //自定义的登录认证方法,Shiro 的 login 方法底层会调用该类的认证方法完成登录认证
    //需要配置自定义的 realm 生效,在 ini 文件中配置,或 Springboot 中配置
    //该方法只是获取进行对比的信息,认证逻辑还是按照 Shiro 的底层认证逻辑完成认证
    @Override
    protected AuthenticationInfo doGetAuthenticationInfo(AuthenticationToken token) throws AuthenticationException {
        //1 获取身份信息
        String principal = token.getPrincipal().toString();
        //2 获取凭证信息
        String password = new String((char[]) token.getCredentials());
        log.info("认证用户信息:" + principal + "---" + password);
        //3 获取数据库中存储的用户信息
        String dbUserName = "root";
        if (principal.equals(dbUserName)) {
            //比较密码
            String dbPass = "8416adb5b39ecf7b7cfc29bdcf156d0c6fc95c24bf7d648551c94e89136efd87";
            return new SimpleAuthenticationInfo(token.getPrincipal(), dbPass, ByteSource.Util.bytes("salt"), principal);
        }
        return null;
    }
}
1
2
3
4
5
6
7
8
9
10
11
12
13
14
15
16
17
18
19
20
21
2
3
4
5
6
7
8
9
10
11
12
13
14
15
16
17
18
19
20
21
2、在 shiro.ini 中添加配置信息
[main]
myRealm = org.example.MyRealm
securityManager.realms = $myRealm

hashedCredentialsMatcher = org.apache.shiro.authc.credential.Sha256CredentialsMatcher
hashedCredentialsMatcher.hashIterations = 3

myRealm.credentialsMatcher = $hashedCredentialsMatcher
1
2
3
4
5
6
7
8
2
3
4
5
6
7
8
3、再次执行 Tutorial。
上次更新: 2025/09/02, 06:01:00