
 SpringBoot3-场景集成
# Redis 整合
# 场景整合
依赖导入
<dependency>
    <groupId>org.springframework.boot</groupId>
    <artifactId>spring-boot-starter-data-redis</artifactId>
</dependency>
2
3
4
配置
spring.data.redis.host=127.0.0.1
spring.data.redis.password=123456
2
测试
@Autowired
StringRedisTemplate redisTemplate;
@Test
void redisTest(){
    redisTemplate.opsForValue().set("a","1234");
    Assertions.assertEquals("1234",redisTemplate.opsForValue().get("a"));
}
2
3
4
5
6
7
# 自动配置原理
META-INF/spring/org.springframework.boot.autoconfigure.AutoConfiguration.imports中导入了RedisAutoConfiguration、RedisReactiveAutoConfiguration和RedisRepositoriesAutoConfiguration。所有属性绑定在RedisProperties中。RedisReactiveAutoConfiguration属于响应式编程,不用管。RedisRepositoriesAutoConfiguration属于 JPA 操作,也不用管RedisAutoConfiguration配置了以下组件LettuceConnectionConfiguration: 给容器中注入了连接工厂 LettuceConnectionFactory,和操作 redis 的客户端 DefaultClientResources。RedisTemplate<Object, Object>: 可给 redis 中存储任意对象,会使用 jdk 默认序列化方式。StringRedisTemplate: 给 redis 中存储字符串,如果要存对象,需要开发人员自己进行序列化。key-value 都是字符串进行操作。
# 定制化
# 序列化机制
@Configuration
public class AppRedisConfiguration {
    /**
     * 允许Object类型的key-value,都可以被转为json进行存储。
     * @param redisConnectionFactory 自动配置好了连接工厂
     * @return
     */
    @Bean
    public RedisTemplate<Object, Object> redisTemplate(RedisConnectionFactory redisConnectionFactory) {
        RedisTemplate<Object, Object> template = new RedisTemplate<>();
        template.setConnectionFactory(redisConnectionFactory);
        //把对象转为json字符串的序列化工具
        template.setDefaultSerializer(new GenericJackson2JsonRedisSerializer());
        return template;
    }
}
2
3
4
5
6
7
8
9
10
11
12
13
14
15
16
# redis 客户端
RedisTemplate、StringRedisTemplate: 操作 redis 的工具类
- 要从 redis 的连接工厂获取链接才能操作 redis
- Redis 客户端
- Lettuce: 默认
- Jedis:可以使用以下切换
<dependency>
    <groupId>org.springframework.boot</groupId>
    <artifactId>spring-boot-starter-data-redis</artifactId>
    <exclusions>
        <exclusion>
            <groupId>io.lettuce</groupId>
            <artifactId>lettuce-core</artifactId>
        </exclusion>
    </exclusions>
</dependency>

<!--切换 jedis 作为操作redis的底层客户端-->
<dependency>
    <groupId>redis.clients</groupId>
    <artifactId>jedis</artifactId>
</dependency>
2
3
4
5
6
7
8
9
10
11
12
13
14
15
16
spring.data.redis.host=127.0.0.1
spring.data.redis.port=6379
#spring.data.redis.client-type=lettuce
#设置lettuce的底层参数
#spring.data.redis.lettuce.pool.enabled=true
#spring.data.redis.lettuce.pool.max-active=8
spring.data.redis.client-type=jedis
spring.data.redis.jedis.pool.enabled=true
spring.data.redis.jedis.pool.max-active=8
2
3
4
5
6
7
8
9
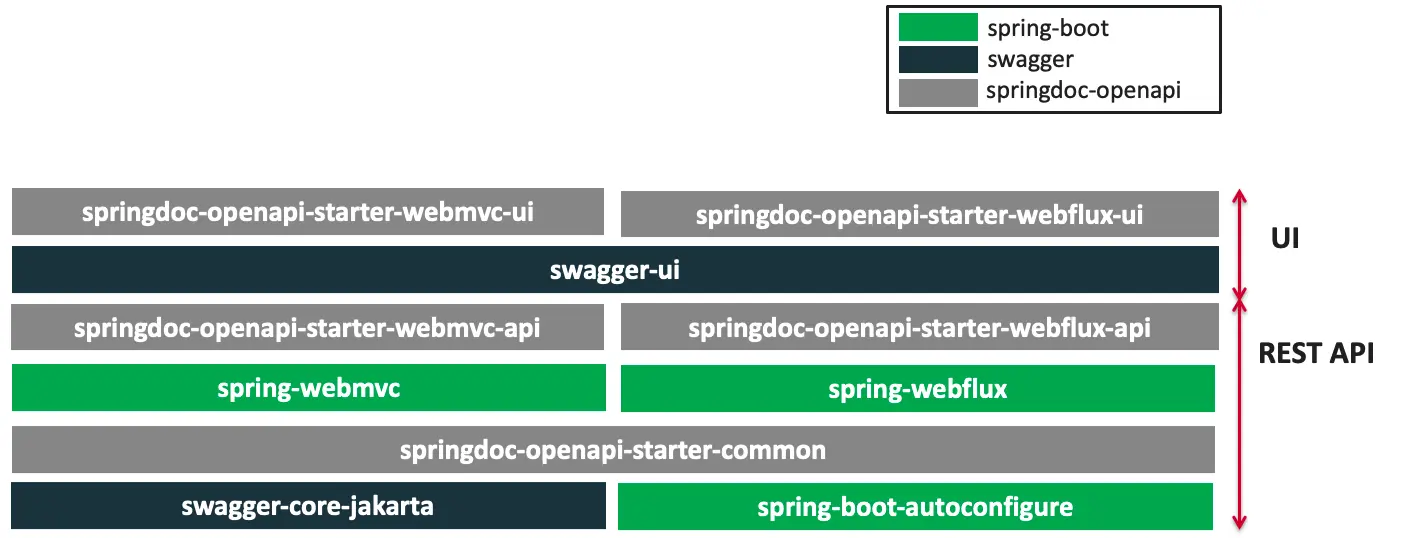
# OpenAPI 3 与 Swagger
Swagger 可以快速生成实时接口文档,方便前后开发人员进行协调沟通。遵循 OpenAPI 规范。
文档:https://springdoc.org/
# OpenAPI 3 架构
# 整合
<dependency>
    <groupId>org.springdoc</groupId>
    <artifactId>springdoc-openapi-starter-webmvc-ui</artifactId>
    <version>2.1.0</version>
</dependency>
2
3
4
5
# 使用
# 常用注解
| 注解 | 标注位置 | 作用 |
|---|---|---|
| @Tag | controller 类 | 标识 controller 作用 |
| @Parameter | 参数 | 标识参数作用 |
| @Parameters | 参数 | 参数多重说明 |
| @Schema | model 层的 JavaBean | 描述模型作用及每个属性 |
| @Operation | 方法 | 描述方法作用 |
| @ApiResponse | 方法 | 描述响应状态码等 |
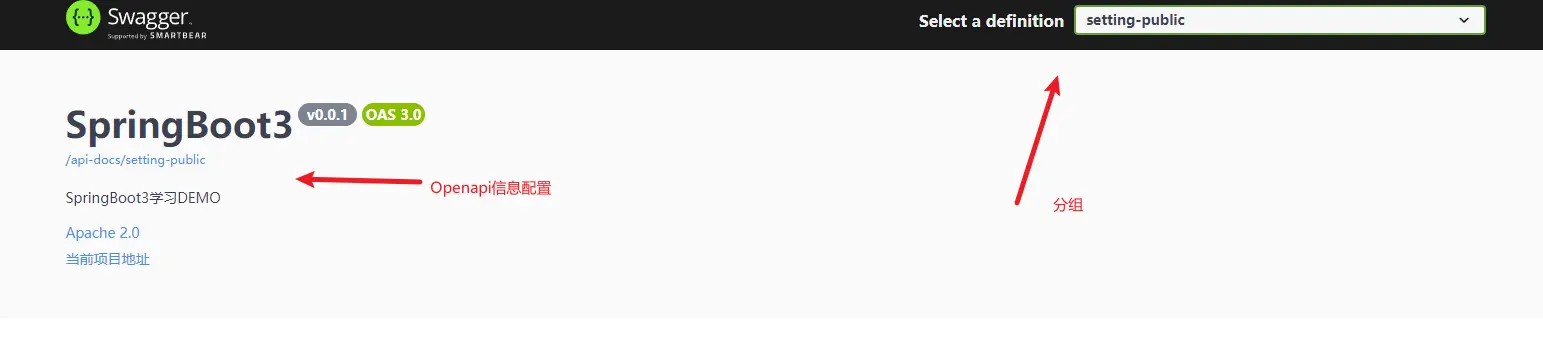
# Docket 配置
@Configuration
public class SpringDocConfig {
    /**
     * 分组,这个主要会在右上角下拉框中进行分组,可以多个创建
     * @return
     */
    @Bean
    public GroupedOpenApi SettingGroup() {
        return GroupedOpenApi.builder()
                .group("setting-public")
                .pathsToMatch("/setting/**")
                .build();
    }
}
2
3
4
5
6
7
8
9
10
11
12
13
14
如果只有一个 Docket,可以配置如下
## SpringDoc应该扫描哪些包来发现和生成OpenAPI文档中的API信息。
springdoc.packagesToScan=org.example.springboot3.learn.controller
## SpringDoc应该匹配哪些URL路径来生成OpenAPI文档中的API信息。
springdoc.pathsToMatch=/setting/save
1
2
3
4
# OpenAPI 配置
@Bean
public OpenAPI springShopOpenAPI() {
    return new OpenAPI()
            .info(new Info().title("SpringBoot3")
                    .description("SpringBoot3学习DEMO")
                    .version("v0.0.1")
                    .license(new License().name("Apache 2.0").url("http://springdoc.org")))
            .externalDocs(new ExternalDocumentation()
                    .description("当前项目地址")
                    .url("http://localhost:8080"));
}
2
3
4
5
6
7
8
9
10
11
# Springfox 迁移
这个变化也可以在上面提的官方文档中看到
# 注解变化
| 原注解 | 现注解 | 作用 |
|---|---|---|
| @Api | @Tag | 描述 Controller |
| @ApiIgnore | @Parameter(hidden = true) @Operation(hidden = true) @Hidden | 描述忽略操作 |
| @ApiImplicitParam | @Parameter | 描述参数 |
| @ApiImplicitParams | @Parameters | 描述参数 |
| @ApiModel | @Schema | 描述对象 |
| @ApiModelProperty(hidden = true) | @Schema(accessMode = READ_ONLY) | 描述对象属性 |
| @ApiModelProperty | @Schema | 描述对象属性 |
| @ApiOperation(value = "foo", notes = "bar") | @Operation(summary = "foo", description = "bar") | 描述方法 |
| @ApiParam | @Parameter | 描述参数 |
| @ApiResponse(code = 404, message = "foo") | @ApiResponse(responseCode = "404", description = "foo") | 描述响应 |
# 老版本 Docket 配置
@Bean
public Docket publicApi() {
  return new Docket(DocumentationType.SWAGGER_2)
          .select()
          .apis(RequestHandlerSelectors.basePackage("org.github.springshop.web.public"))
          .paths(PathSelectors.regex("/public.*"))
          .build()
          .groupName("springshop-public")
          .apiInfo(apiInfo());
}

@Bean
public Docket adminApi() {
  return new Docket(DocumentationType.SWAGGER_2)
          .select()
          .apis(RequestHandlerSelectors.basePackage("org.github.springshop.web.admin"))
          .paths(PathSelectors.regex("/admin.*"))
          .apis(RequestHandlerSelectors.withMethodAnnotation(Admin.class))
          .build()
          .groupName("springshop-admin")
          .apiInfo(apiInfo());
}
2
3
4
5
6
7
8
9
10
11
12
13
14
15
16
17
18
19
20
21
22
老版本 OpenAPI 配置
@Bean
public OpenAPI springShopOpenAPI() {
  return new OpenAPI()
          .info(new Info().title("SpringShop API")
          .description("Spring shop sample application")
          .version("v0.0.1")
          .license(new License().name("Apache 2.0").url("http://springdoc.org")))
          .externalDocs(new ExternalDocumentation()
          .description("SpringShop Wiki Documentation")
          .url("https://springshop.wiki.github.org/docs"));
}
2
3
4
5
6
7
8
9
10
11
# 远程调用
RPC(Remote Procedure Call):远程过程调用
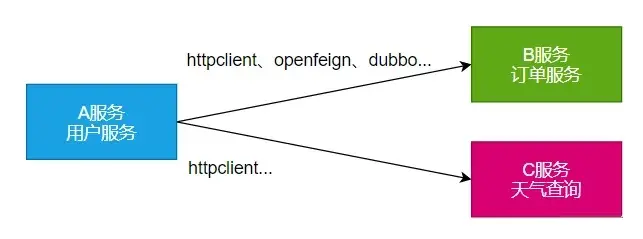
本地过程调用: a (); b (); a () { b ();}: 不同方法都在同一个 JVM 运行
远程过程调用:
- 服务提供者:
- 服务消费者:
- 通过连接对方服务器进行请求 \ 响应交互,来实现调用效果
API/SDK 的区别是什么?
api:接口(Application Programming Interface)远程提供功能
sdk:工具包(Software Development Kit)导入 jar 包,直接调用功能即可
开发过程中,我们经常需要调用别人写的功能
- 如果是内部微服务,可以通过依赖 cloud、注册中心、openfeign 等进行调用
- 如果是外部暴露的,可以发送 http 请求、或遵循外部协议进行调用
笔记
SpringBoot 整合提供了很多方式进行远程调用
轻量级客户端方式
- RestTemplate: 普通开发
- WebClient: 响应式编程开发
- Http Interface: 声明式编程
Spring Cloud 分布式解决方案方式
- Spring Cloud OpenFeign
- 第三方框架
- Dubbo
- gRPC
# WebClient
非阻塞、响应式 HTTP 客户端
# 创建与配置
发请求:
- 请求方式: GET\POST\DELETE\xxxx
- 请求路径: /xxx
- 请求参数:aa=bb&cc=dd&xxx
- 请求头: aa=bb,cc=ddd
- 请求体:
创建 WebClient 非常简单:
- WebClient.create()
- WebClient.create(String baseUrl)
还可以使用 WebClient.builder () 配置更多参数项
- uriBuilderFactory:自定义 UriBuilderFactory,定义 baseurl
- defaultUriVariables:默认 uri 变量
- defaultHeader:每个请求默认头
- defaultCookie:每个请求默认 cookie
- defaultRequest:Consumer 自定义每个请求
- filter:过滤 client 发送的每个请求
- exchangeStrategies:HTTP 消息 reader/writer 自定义
- clientConnector:HTTP client 库设置
//获取响应完整信息
WebClient client = WebClient.create("https://example.org");
2
# 获取响应
retrieve () 方法用来声明如何提取响应数据。比如
//获取响应完整信息
WebClient client = WebClient.create("https://example.org");

Mono<ResponseEntity<Person>> result = client.get()
        .uri("/persons/{id}", id).accept(MediaType.APPLICATION_JSON)
        .retrieve()
        .toEntity(Person.class);

//只获取body
WebClient client = WebClient.create("https://example.org");

Mono<Person> result = client.get()
        .uri("/persons/{id}", id).accept(MediaType.APPLICATION_JSON)
        .retrieve()
        .bodyToMono(Person.class);

//stream数据
Flux<Quote> result = client.get()
        .uri("/quotes").accept(MediaType.TEXT_EVENT_STREAM)
        .retrieve()
        .bodyToFlux(Quote.class);

//定义错误处理
Mono<Person> result = client.get()
        .uri("/persons/{id}", id).accept(MediaType.APPLICATION_JSON)
        .retrieve()
        .onStatus(HttpStatus::is4xxClientError, response -> ...)
        .onStatus(HttpStatus::is5xxServerError, response -> ...)
        .bodyToMono(Person.class);
2
3
4
5
6
7
8
9
10
11
12
13
14
15
16
17
18
19
20
21
22
23
24
25
26
27
28
29
例子
@RestController
public class ApiController {
    private final String appcode = "your_appcode";

    @GetMapping("v1/getWeather")
    public Mono<String> getWeather() {
        WebClient client = WebClient.create("https://iweather.market.alicloudapi.com");
        Map<String, String> querys = new HashMap<String, String>();
        querys.put("needday", "1");
        querys.put("prov", "浙江");
        querys.put("city", "杭州");
        querys.put("area", "西湖");

        Mono<String> toMono = client.get().uri("/address?needday={needday}&prov={prov}&city={city}&area={area}", querys)
                .accept(MediaType.APPLICATION_JSON)
                .header("Authorization", "APPCODE " + appcode)
                .retrieve().bodyToMono(String.class).map(response -> {
                    // 将 Unicode 编码转换为中文字符
                    return StringEscapeUtils.unescapeJava(response);
                });
        return toMono;
    }

}
2
3
4
5
6
7
8
9
10
11
12
13
14
15
16
17
18
19
20
21
22
23
24
# 定义请求体
//1、响应式-单个数据
Mono<Person> personMono = ... ;

Mono<Void> result = client.post()
        .uri("/persons/{id}", id)
        .contentType(MediaType.APPLICATION_JSON)
        .body(personMono, Person.class)
        .retrieve()
        .bodyToMono(Void.class);

//2、响应式-多个数据
Flux<Person> personFlux = ... ;

Mono<Void> result = client.post()
        .uri("/persons/{id}", id)
        .contentType(MediaType.APPLICATION_STREAM_JSON)
        .body(personFlux, Person.class)
        .retrieve()
        .bodyToMono(Void.class);

//3、普通对象
Person person = ... ;

Mono<Void> result = client.post()
        .uri("/persons/{id}", id)
        .contentType(MediaType.APPLICATION_JSON)
        .bodyValue(person)
        .retrieve()
        .bodyToMono(Void.class);
2
3
4
5
6
7
8
9
10
11
12
13
14
15
16
17
18
19
20
21
22
23
24
25
26
27
28
29
# HTTP Interface
Spring 允许我们通过定义接口的方式,给任意位置发送 http 请求,实现远程调用,可以用来简化 HTTP 远程访问。需要 webflux 场景才可用
# 导入依赖
<dependency>
    <groupId>org.springframework.boot</groupId>
    <artifactId>spring-boot-starter-webflux</artifactId>
</dependency>
2
3
4
# 定义接口
public interface WeatherService {
    //定义请求路径,和类型
    @GetExchange(url = "address",accept = "application/json")
    Mono<String> getWeather(@RequestParam("needday") String needday,
                            @RequestParam("prov") String prov,
                            @RequestParam("city") String city,
                            @RequestParam("area") String area,
                            @RequestHeader("Authorization") String code);
}
2
3
4
5
6
7
8
9
# 请求
@GetMapping("v2/getWeather")
public Mono<String> getWeather2() {
    //1、创建客户端
    WebClient client = WebClient.builder()
            .baseUrl("https://iweather.market.alicloudapi.com")
            .codecs(clientCodecConfigurer -> {
                clientCodecConfigurer
                        .defaultCodecs()
                        .maxInMemorySize(256 * 1024 * 1024);
                //响应数据量太大有可能会超出BufferSize,所以这里设置的大一点
            })
            .build();
    WebClientAdapter adapter = WebClientAdapter.create(client);
    //2、创建工厂
    HttpServiceProxyFactory factory = HttpServiceProxyFactory.builderFor(adapter).build();
    //3、获取代理对象
    WeatherService weatherService = factory.createClient(WeatherService.class);
    //4、测试调用
    // 将 Unicode 编码转换为中文字符
    Mono<String> search = weatherService.getWeather("1", "浙江", "杭州", "西湖", appcode).map(StringEscapeUtils::unescapeJava);
    return search;
}
2
3
4
5
6
7
8
9
10
11
12
13
14
15
16
17
18
19
20
21
22
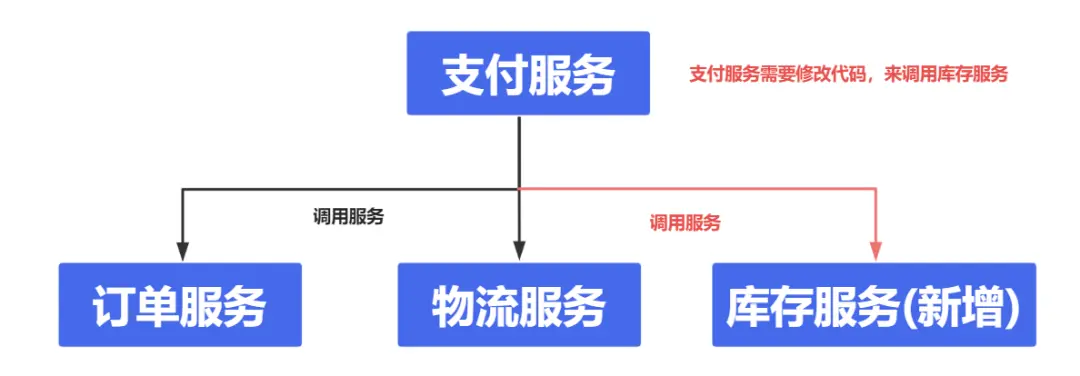
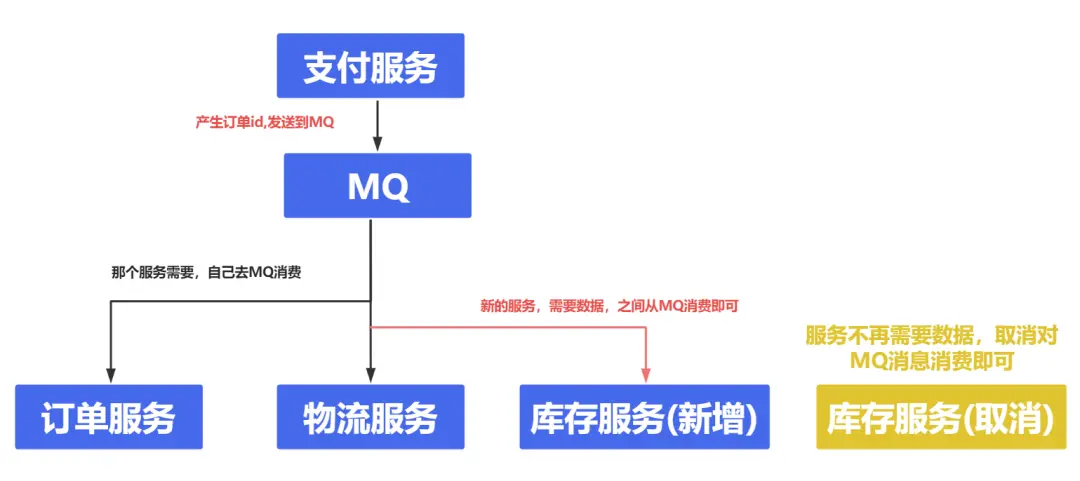
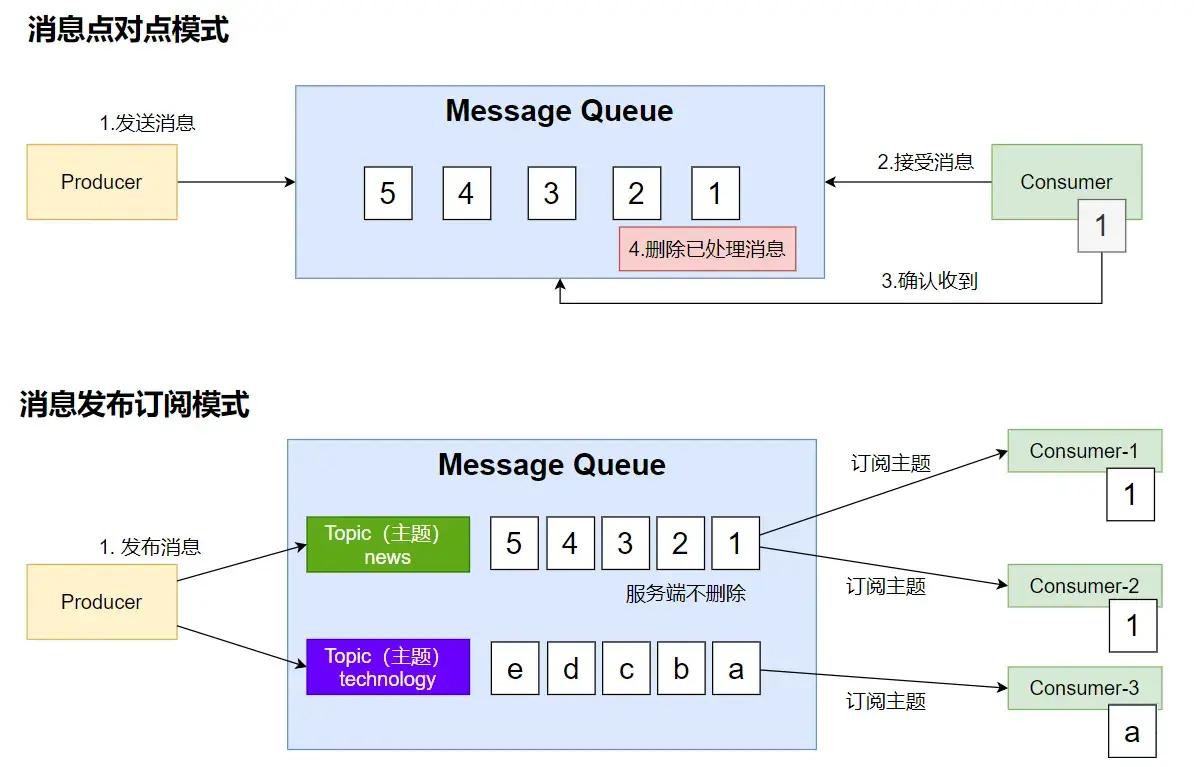
# 消息队列 - 场景
# 异步
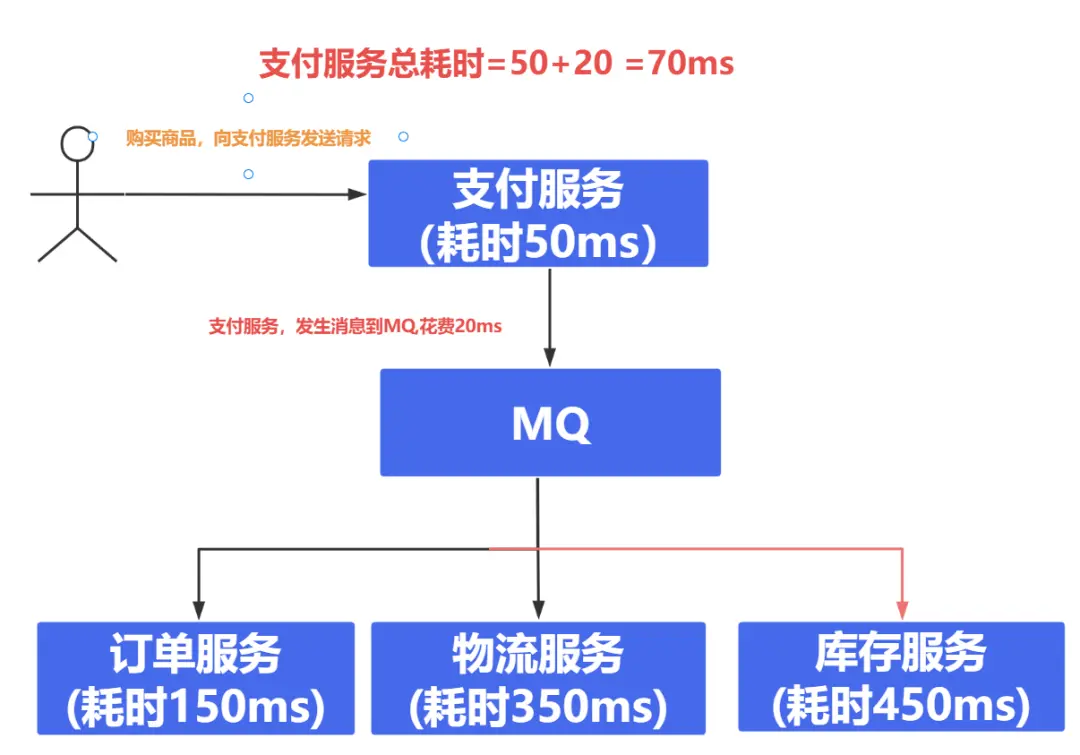
# 解耦
# 削峰

# 缓冲
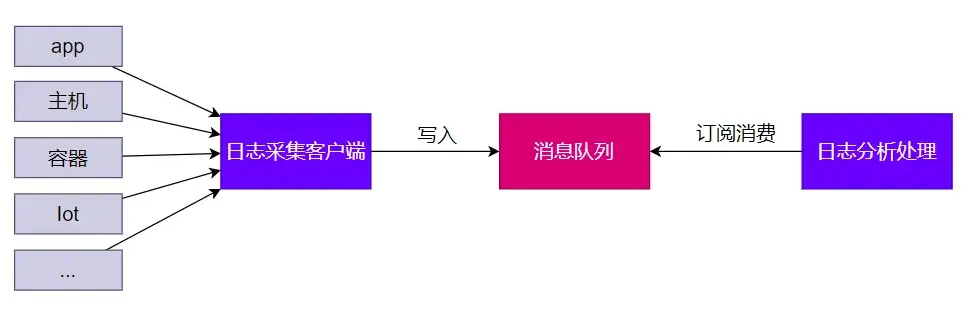
# 消息队列 - Kafka
# 消息模式

# SpringBoot 整合
官网:https://docs.spring.io/spring-kafka/reference/index.html
需要首先安装 kafka 服务,如需要请参考安装教程 (opens new window),这个根据 kafka 官网修改搭建,生产环境请自行斟酌。
# 导入依赖
<dependency>
    <groupId>org.springframework.kafka</groupId>
    <artifactId>spring-kafka</artifactId>
</dependency>
2
3
4
# 配置
spring.kafka.bootstrap-servers=localhost:9092
## 这两个配置分别用于配置 Kafka 生产者(Producer)和消费者(Consumer)的序列化和反序列化方式。

## 1. `spring.kafka.producer.value-serializer`: 该配置指定了 Kafka 生产者发送消息时,消息值(Value)的序列化器。表示将消息值序列化为字符串。
## 2. `spring.kafka.consumer.value-deserializer`:该配置指定了 Kafka 消费者接收消息时,消息值(Value)的反序列化器,表示将消息值反序列化为 JSON 对象。
spring.kafka.producer.value-serializer=org.apache.kafka.common.serialization.StringSerializer
spring.kafka.consumer.value-deserializer=org.springframework.kafka.support.serializer.JsonDeserializer
2
3
4
5
6
7
# 源码跟踪
KafkaAutoConfiguration 中配置了 kafka 核心的类。
//kafka的核心类,直接操作消息发送的类
@Bean
@ConditionalOnMissingBean(KafkaTemplate.class)
public KafkaTemplate<?, ?> kafkaTemplate(ProducerFactory<Object, Object> kafkaProducerFactory,
        ProducerListener<Object, Object> kafkaProducerListener,
        ObjectProvider<RecordMessageConverter> messageConverter) {
//......
}
//kafka用来操作消费者的类
@Bean
@ConditionalOnMissingBean(ConsumerFactory.class)
public DefaultKafkaConsumerFactory<?, ?> kafkaConsumerFactory(KafkaConnectionDetails connectionDetails,
        ObjectProvider<DefaultKafkaConsumerFactoryCustomizer> customizers, ObjectProvider<SslBundles> sslBundles) {
//......
}

//其余的都可以在org.springframework.boot.autoconfigure.kafka.KafkaAutoConfiguration中查看
2
3
4
5
6
7
8
9
10
11
12
13
14
15
16
17
# 消息发送
@Configuration
public class TopicCreate {
    /**
     * 创建Topic 30 分区 1 副本
     * @return
     */
    @Bean
    public NewTopic orderTopic() {
        return TopicBuilder.name("order")
                .partitions(30)
                .replicas(1)
                .compact()
                .build();
    }
}
2
3
4
5
6
7
8
9
10
11
12
13
14
15
@SpringBootTest
public class KafkaApplicationTests {

    @Autowired
    KafkaTemplate kafkaTemplate;

    /**
     * 发送消息
     */
    @Test
    void contextLoads() {
        StopWatch watch = new StopWatch();
        watch.start();
        CompletableFuture[] futures = new CompletableFuture[10000];
        for (int i = 0; i < 10000; i++) {
            CompletableFuture send = kafkaTemplate.send("order",  "order.create." + i, "订单创建了:" + i);
            futures[i] = send;
        }
        CompletableFuture.allOf(futures).join();
        watch.stop();
        System.out.println("总耗时:" + watch.getTotalTimeMillis());
    }
}
2
3
4
5
6
7
8
9
10
11
12
13
14
15
16
17
18
19
20
21
22
23
# 消息监听
@Component
public class OrderMsgListener {

    /**
     * 可以监听到发给kafka的新消息,以前的拿不到
     *
     * @param record 消息
     */
    @KafkaListener(id = "1", topics = "order", groupId = "ocp-1")
    public void listen(ConsumerRecord<String, String> record) {
        System.out.println("收到消息:" + record);
    }

    /**
     * 可以收到之前发的消息
     *
     * @param record 消息
     * @PartitionOffset partition = "0-29"  监听topic中0-29分区的消息
     * initialOffset = "0" 初始值从第0个分区开始
     */
    @KafkaListener(id = "2", groupId = "ocp-2", topicPartitions =
            {@TopicPartition(topic = "order", partitions = "0-29"))
            })
    public void listenAll(ConsumerRecord<String, String> record) {
        System.out.println("收到" + record.partition() + "消息:" + record);
    }

    /**
     * @param ack 手动确认,如果不需手动确认则可以删除这个参数
	 * 第一种方式只是一种演示,如果标注了initialOffset= 0那么每次项目启动都会重新从第0个分区开始消费,也就是说会有重复的情况,这可以保证每一条消息都会被消费,但是需要在消费时做好幂等
     */
    //@KafkaListener(id = "3", groupId = "ocp-3", topicPartitions =
            //{@TopicPartition(topic = "order", partitionOffsets = @PartitionOffset(partition = "0-29", initialOffset = //"0"))})
    @KafkaListener(id = "3", groupId = "ocp-3", topicPartitions =
            {@TopicPartition(topic = "order", partitions = "0-29"))
            })
    public void listenAllAndAck(ConsumerRecord<String, String> record, Acknowledgment ack) {
        if (record.partition() != 1) {
            System.out.println("收到" + record.partition() + "消息:" + record);
            ack.acknowledge();
            System.out.println("手动收到了消息");
        } else {
            ack.nack(Duration.ZERO);
        }
    }
}
2
3
4
5
6
7
8
9
10
11
12
13
14
15
16
17
18
19
20
21
22
23
24
25
26
27
28
29
30
31
32
33
34
35
36
37
38
39
40
41
42
43
44
45
46
## 如果开启了手动提交则需要配置
#这个配置将Kafka监听器的确认模式设置为手动(manual)
spring.kafka.listener.ack-mode=manual
#这个配置禁用了Kafka消费者的自动提交偏移量功能。
spring.kafka.consumer.enable-auto-commit=false
2
3
4
5
- MANUAL 模式:在这种模式下,用户需要手动调用
Acknowledgment.acknowledge()来确认消息。确认操作会被批量进行,即确认操作被延迟到一批消息都处理完毕后再发送给 Kafka。这种模式的优点是可以提高效率,因为减少了与 Kafka 服务器的交互次数。但缺点是,如果一批消息消费了一半,消费者突然异常宕机,因为数据没有及时向 Kafka 服务端确认,下次就会重复拉取到消息,导致部分数据被重复消费 1。- MANUAL_IMMEDIATE 模式:与 MANUAL 模式类似,消费者同样需要手动调用
Acknowledgment.acknowledge()来确认消息。但与 MANUAL 模式不同的是,MANUAL_IMMEDIATE 模式下,每条消息都会在处理后立即确认,而不是等待一批消息处理完毕后再进行确认。这种即时确认的方式可以确保消息的可靠性,避免因消费者宕机导致的消息重复消费问题,但可能会增加与 Kafka 服务器的交互次数,从而可能略微降低处理效率 12。
## 当 Kafka 消费者接收到一个 JSON 消息时,如果没有其他特定的类型信息,它会尝试将 JSON 反序列化为 com.example.Invoice 类型的对象。
spring.kafka.consumer.properties[spring.json.value.default.type]=com.example.Invoice
## 这行配置定义了可信任的包列表。出于安全考虑,Spring 默认只允许反序列化来自 java.util 和 java.lang 包的类。通过这个设置,你可以添加其他你信任的包,允许反序列化这些包中的类。
spring.kafka.consumer.properties[spring.json.trusted.packages]=com.example.main,com.example.another
2
3
4
## 禁止序列化的时候进行头信息序列化
spring.kafka.producer.properties[spring.json.add.type.headers]=false
2
# Web 安全
- Apache Shiro
- Spring Security
- 自研:Filter
# Spring Security
# 安全架构
# 认证:Authentication
who are you?
登录系统,用户系统
# 授权:Authorization
what are you allowed to do?
权限管理,用户授权
# 攻击防护
- XSS(Cross-site scripting)
- CSRF(Cross-site request forgery)
- CORS(Cross-Origin Resource Sharing)
- SQL 注入
- ...
# 扩展 - 权限模型
点击查看
RBAC
Role Based Access Controll
- 用户(t_user)
- id,username,password,xxx
- 1,zhangsan
- 2,lisi
- 用户_角色(t_user_role)【N对N关系需要中间表】
- zhangsan, admin
- zhangsan,common_user
- lisi, hr
- lisi, common_user
- 角色(t_role)
- id,role_name
- admin
- hr
- common_user
- 角色_权限(t_role_perm)
- admin, 文件r
- admin, 文件w
- admin, 文件执行
- admin, 订单query,create,xxx
- hr, 文件r
- 权限(t_permission)
- id,perm_id
- 文件 r,w,x
- 订单 query,create,xxx
ACL
Access Controll List
直接用户和权限挂钩
- 用户(t_user)
- zhangsan
- lisi
- 用户_权限(t_user_perm)
- zhangsan,文件 r
- zhangsan,文件 x
- zhangsan,订单 query
- 权限(t_permission)
- id,perm_id
- 文件 r,w,x
- 订单 query,create,xxx
# Spring Security 原理
官方文档:https://docs.spring.io/spring-security/reference/getting-spring-security.html
# 过滤器链架构
Spring Security 利用 FilterChainProxy 封装一系列拦截器链,实现各种安全拦截功能
Servlet 三大组件:Servlet、Filter、Listener
# 使用
# 依赖
<dependency>
    <groupId>org.springframework.boot</groupId>
    <artifactId>spring-boot-starter-security</artifactId>
</dependency>
<dependency>
    <groupId>org.thymeleaf.extras</groupId>
    <artifactId>thymeleaf-extras-springsecurity6</artifactId>
    <version>3.1.1.RELEASE</version>
</dependency>
<dependency>
    <groupId>org.springframework.boot</groupId>
    <artifactId>spring-boot-starter-thymeleaf</artifactId>
</dependency>
2
3
4
5
6
7
8
9
10
11
12
13
# 页面
<!--login.html-->
<!DOCTYPE html>
<html xmlns="http://www.w3.org/1999/xhtml" xmlns:th="https://www.thymeleaf.org">
<head>
    <title>登录</title>
</head>
<body>
<div th:if="${param.error}">Invalid username and password.</div>
<div th:if="${param.logout}">You have been logged out.</div>
<form th:action="@{/login}" method="post">
    <div>
        <label> User Name : <input type="text" name="username" /> </label>
    </div>
    <div>
        <label> Password: <input type="password" name="password" /> </label>
    </div>
    <div><input type="submit" value="Sign In" /></div>
</form>
</body>
</html>
2
3
4
5
6
7
8
9
10
11
12
13
14
15
16
17
18
19
20
<!--welcome.html-->
<!DOCTYPE html>
<html lang="en">
<head>
    <meta charset="UTF-8">
    <title>欢迎</title>
</head>
<body>
<h1>你好</h1>
<button id="logoutButton">登出</button>
<script>
    document.getElementById('logoutButton').addEventListener('click', function () {
        window.location.href = '/logout';
    });
</script>
</body>
</html>
2
3
4
5
6
7
8
9
10
11
12
13
14
15
16
17
<!--index.html-->
<!DOCTYPE html>
<html lang="en">
<head>
    <meta charset="UTF-8">
    <title>你好</title>
</head>
<body>
<h1>你好</h1>
</body>
</html>
2
3
4
5
6
7
8
9
10
11
# 配置
/**
 * 页面跳转配置类,不用再写Controller
 */
@Configuration
public class MvcConfig implements WebMvcConfigurer {
    public void addViewControllers(ViewControllerRegistry registry) {
        registry.addViewController("/welcome").setViewName("welcome");
        registry.addViewController("/").setViewName("hello");
        registry.addViewController("/login").setViewName("login");
    }
}
2
3
4
5
6
7
8
9
10
11
@Configuration
public class SecurityConfig {
    @Bean
    SecurityFilterChain securityFilterChain(HttpSecurity http) throws Exception {
        http.authorizeHttpRequests(requests -> requests.requestMatchers("/").permitAll().anyRequest().authenticated())
                .formLogin(requests -> requests.loginPage("/login").permitAll()) //设置登录页
                .logout(requests -> requests.logoutRequestMatcher(new AntPathRequestMatcher("/logout", "GET")).permitAll()); // 设置登出,默认登出是post请求
        return http.build();
    }

    /**
     * 命令配置用户名和密码身份验证
     */
    @Bean
    public UserDetailsService userDetailsService(PasswordEncoder passwordEncoder) {
        UserDetails userDetails = User.builder()
                .username("admin")
                .password(passwordEncoder.encode("admin"))
                .roles("admin")
                .build();
        return new InMemoryUserDetailsManager(userDetails);
    }

    /**
     * 密码加密器
     */
    @Bean
    public PasswordEncoder passwordEncoder() {
        return PasswordEncoderFactories.createDelegatingPasswordEncoder();
    }
}
2
3
4
5
6
7
8
9
10
11
12
13
14
15
16
17
18
19
20
21
22
23
24
25
26
27
28
29
30
31
关于授权(Authorization)的代码暂时先不写了,感觉写了不如直接看官网,官网写的非常清除,相关章节 (opens new window)。
# 可观测性
可观测性 Observability
对线上应用进行观测、监控、预警...
- 健康状况【组件状态、存活状态】Health
- 运行指标【cpu、内存、垃圾回收、吞吐量、响应成功率...】Metrics
- 链路追踪
- ...
# SpringBoot Actuator
# 导入依赖
<dependency>
    <groupId>org.springframework.boot</groupId>
    <artifactId>spring-boot-starter-actuator</artifactId>
</dependency>
2
3
4
# 配置
## 开启所有端点
management.endpoints.enabled-by-default=true
## 暴露所有端点
management.endpoints.web.exposure.include=*
2
3
4
# 访问端点
访问 http://localhost:8080/actuator (opens new window);展示出所有可以用的监控端点
# Endpoint
# 常用端点
| ID | 描述 |
|---|---|
auditevents | 暴露当前应用程序的审核事件信息。需要一个 AuditEventRepository组件 。 |
beans | 显示应用程序中所有 Spring Bean 的完整列表。 |
caches | 暴露可用的缓存。 |
conditions | 显示自动配置的所有条件信息,包括匹配或不匹配的原因。 |
configprops | 显示所有 @ConfigurationProperties 。 |
env | 暴露 Spring 的属性 ConfigurableEnvironment |
flyway | 显示已应用的所有 Flyway 数据库迁移。 需要一个或多个 Flyway 组件。 |
health | 显示应用程序运行状况信息。 |
httptrace | 显示 HTTP 跟踪信息(默认情况下,最近 100 个 HTTP 请求 - 响应)。需要一个 HttpTraceRepository 组件。 |
info | 显示应用程序信息。 |
integrationgraph | 显示 Spring integrationgraph 。需要依赖 spring-integration-core 。 |
loggers | 显示和修改应用程序中日志的配置。 |
liquibase | 显示已应用的所有 Liquibase 数据库迁移。需要一个或多个 Liquibase 组件。 |
metrics | 显示当前应用程序的 “指标” 信息。 |
mappings | 显示所有 @RequestMapping 路径列表。 |
scheduledtasks | 显示应用程序中的计划任务。 |
sessions | 允许从 Spring Session 支持的会话存储中检索和删除用户会话。需要使用 Spring Session 的基于 Servlet 的 Web 应用程序。 |
shutdown | 使应用程序正常关闭。默认禁用。 |
startup | 显示由 ApplicationStartup 收集的启动步骤数据。需要使用 SpringApplication 进行配置 BufferingApplicationStartup 。 |
threaddump | 执行线程转储。 |
heapdump | 返回 hprof 堆转储文件。 |
jolokia | 通过 HTTP 暴露 JMX bean(需要引入 Jolokia,不适用于 WebFlux)。需要引入依赖 jolokia-core 。 |
logfile | 返回日志文件的内容(如果已设置 logging.file.name 或 logging.file.path 属性)。支持使用 HTTP Range 标头来检索部分日志文件的内容。 |
prometheus | 以 Prometheus 服务器可以抓取的格式公开指标。需要依赖 micrometer-registry-prometheus 。 |
# 定制端点
- 健康监控:返回存活、死亡
- 指标监控:次数、率
# 健康端点
/**
 * 检查系统的基类
 */
@Configuration
public class HealthBaseCheck {

    public Health getCheck() {
        Health.Builder builder = new Health.Builder();

        // 检查数据库连接
        if (checkDatabaseConnection()) {
            builder.up().withDetail("database", "数据库连接正常");
        } else {
            builder.down().withDetail("database", "数据库连接失败");
        }

        // 检查外部服务
        if (checkExternalService()) {
            builder.withDetail("external_service", "外部服务正常");
        } else {
            builder.down().withDetail("external_service", "外部服务不可用");
        }

        // 检查系统内存
        MemoryStatus memoryStatus = checkMemoryStatus();
        builder.withDetail("memory", memoryStatus);

        return builder.build();
    }

    private boolean checkDatabaseConnection() {
        try {
            //检查数据库连接
            return true;
        } catch (Exception e) {
            return false;
        }
    }

    private boolean checkExternalService() {
        try {
            return true;
        } catch (Exception e) {
            return false;
        }
    }

    private MemoryStatus checkMemoryStatus() {
        MemoryMXBean memoryBean = ManagementFactory.getMemoryMXBean();
        long usedHeapMemory = memoryBean.getHeapMemoryUsage().getUsed();
        long maxHeapMemory = memoryBean.getHeapMemoryUsage().getMax();
        double memoryUsagePercentage = (double) usedHeapMemory / maxHeapMemory * 100;

        return new MemoryStatus(usedHeapMemory, maxHeapMemory, memoryUsagePercentage);
    }

    private record MemoryStatus(long used, long max, double usagePercentage) {
        @Override
        public String toString() {
            return String.format("已使用: %d MB, 最大: %d MB, 使用率: %.2f%%",
                    used / (1024 * 1024), max / (1024 * 1024), usagePercentage);
        }
    }
}
2
3
4
5
6
7
8
9
10
11
12
13
14
15
16
17
18
19
20
21
22
23
24
25
26
27
28
29
30
31
32
33
34
35
36
37
38
39
40
41
42
43
44
45
46
47
48
49
50
51
52
53
54
55
56
57
58
59
60
61
62
63
64
### 显示完整的健康端点信息
management.endpoint.health.show-details=always
management.endpoints.enabled-by-default=true
management.endpoints.web.exposure.include=*
2
3
4
/**
 * 自定义健康检查端点
 * 方式1:通过实现HealthIndicator来重写health方法。
 */
@Component("customHealth1")
public class MyHealthIndicator implements HealthIndicator {
    private final HealthBaseCheck healthBaseCheck;
    public MyHealthIndicator(HealthBaseCheck healthBaseCheck) {
        this.healthBaseCheck = healthBaseCheck;
    }
    @Override
    public Health health() {
        return healthBaseCheck.getCheck();
    }
}
2
3
4
5
6
7
8
9
10
11
12
13
14
15
/**
 * 方式2:通过继承AbstractHealthIndicator来重写doHealthCheck
 */
@Component("customHealth2")
@Slf4j
public class MyComHealthIndicator extends AbstractHealthIndicator {
    private final HealthBaseCheck healthBaseCheck;
    public MyComHealthIndicator(HealthBaseCheck healthBaseCheck) {
        this.healthBaseCheck = healthBaseCheck;
    }
    /**
     * 真实的检查方法
     *
     * @param builder
     * @throws Exception
     */
    @Override
    protected void doHealthCheck(Health.Builder builder) throws Exception {
        Health health = healthBaseCheck.getCheck();
        builder.status(health.getStatus());
        builder.withDetail("code", 100)
                .withDetails(health.getDetails());
    }
}
2
3
4
5
6
7
8
9
10
11
12
13
14
15
16
17
18
19
20
21
22
23
24
# 指标端点
//可以通过MeterRegistry的Counter监控到hello的方法被调用了多少次
@RestController
public class MeterRegistryController {
    Counter counter;

    public MeterRegistryController(MeterRegistry registry) {
        counter = registry.counter("mycounter");
    }

    @GetMapping("hello")
    public String hello() {
        counter.increment();
        return "你好";
    }
}
2
3
4
5
6
7
8
9
10
11
12
13
14
15
// 访问hello请求后,访问actuator/metrics
{
  "names": [
    //.........
    "mycounter",
    //.........
  ]
}
//再访问actuator/metrics/mycounter
{
  "name": "mycounter",
  "measurements": [
    {
      "statistic": "COUNT",
      "value": 16
    }
  ],
  "availableTags": [
  ]
}
// availableTags可以通过配置来进行定制
2
3
4
5
6
7
8
9
10
11
12
13
14
15
16
17
18
19
20
21
/**
 * 所有的度量指标添加一个公共标签(common tag)
 */
@Configuration(proxyBeanMethods = false)
public class MyMeterRegistryConfiguration {
	@Bean
	public MeterRegistryCustomizer<MeterRegistry> metricsCommonTags() {
		return (registry) -> registry.config().commonTags("region", "us-east-1");
	}
}
2
3
4
5
6
7
8
9
10
{
  "name": "mycounter",
  "measurements": [
    {
      "statistic": "COUNT",
      "value": 21
    }
  ],
  "availableTags": [
    {
      "tag": "region",
      "values": [
        "us-east-1"
      ]
    }
  ]
}
2
3
4
5
6
7
8
9
10
11
12
13
14
15
16
17
# AOT 与 JIT
AOT:Ahead-of-Time(提前编译):程序执行前,全部被编译成机器码
JIT:Just in Time(即时编译): 程序边编译,边运行;
编译: 源代码(.c、.cpp、.go、.java。。。) === 编译 === 机器码
语言:
- 编译型语言:编译器
- 解释型语言:解释器
# Complier 与 Interpreter
Java:半编译半解释
对于 HotSpot 中的编译器和解释器的详细说明请看:https://blog.easitch.com/137/
| 对比项 | 编译器 | 解释器 |
|---|---|---|
| 机器执行速度 | 快,因为源代码只需被转换一次 | 慢,因为每行代码都需要被解释执行 |
| 开发效率 | 慢,因为需要耗费大量时间编译 | 快,无需花费时间生成目标代码,更快的开发和测试 |
| 调试 | 难以调试编译器生成的目标代码 | 容易调试源代码,因为解释器一行一行地执行 |
| 可移植性(跨平台) | 不同平台需要重新编译目标平台代码 | 同一份源码可以跨平台执行,因为每个平台会开发对应的解释器 |
| 学习难度 | 相对较高,需要了解源代码、编译器以及目标机器的知识 | 相对较低,无需了解机器的细节 |
| 错误检查 | 编译器可以在编译代码时检查错误 | 解释器只能在执行代码时检查错误 |
| 运行时增强 | 无 | 可以动态增强 |
在 OpenJDK 的官方 Wiki 上,介绍了 HotSpot 虚拟机一个相对比较全面的、** 即时编译器(JIT)** 中采用的优化技术列表 (opens new window)。
结合阅读:
- 执行引擎:https://blog.easitch.com/137
- 美团技术:https://tech.meituan.com/2020/10/22/java-jit-practice-in-meituan.html
# JVM 编译器
JVM 中集成了两种编译器,Client Compiler 和 Server Compiler;
- Client Compiler 注重启动速度和局部的优化
- Server Compiler 更加关注全局优化,性能更好,但由于会进行更多的全局分析,所以启动速度会慢。
Client Compiler:
- HotSpot VM 带有一个 Client Compiler C1 编译器
- 这种编译器启动速度快,但是性能比较 Server Compiler 来说会差一些。
- 编译后的机器码执行效率没有 C2 的高
Server Compiler:
- Hotspot 虚拟机中使用的 Server Compiler 有两种:C2 和 Graal。
- 在 Hotspot VM 中,默认的 Server Compiler 是 C2 编译器。
# 分层编译
Java 7 开始引入了分层编译 (Tiered Compiler) 的概念,它结合了 C1 和 C2 的优势,追求启动速度和峰值性能的一个平衡。分层编译将 JVM 的执行状态分为了五个层次。五个层级分别是:
- 解释执行。
- 执行不带 profiling 的 C1 代码。
- 执行仅带方法调用次数以及循环回边执行次数 profiling 的 C1 代码。
- 执行带所有 profiling 的 C1 代码。
- 执行 C2 代码。
profiling 就是收集能够反映程序执行状态的数据。其中最基本的统计数据就是方法的调用次数,以及循环回边的执行次数。