
 整合 Spring Boot
# 框架整合
1、创建项目
2、添加依赖
<?xml version="1.0" encoding="UTF-8"?>
<project xmlns:xsi="http://www.w3.org/2001/XMLSchema-instance" xmlns="http://maven.apache.org/POM/4.0.0"
         xsi:schemaLocation="http://maven.apache.org/POM/4.0.0 https://maven.apache.org/xsd/maven-4.0.0.xsd">
    <modelVersion>4.0.0</modelVersion>
    <parent>
        <groupId>org.springframework.boot</groupId>
        <artifactId>spring-boot-starter-parent</artifactId>
        <version>2.2.13.RELEASE</version>
        <relativePath/> <!-- lookup parent from repository -->
    </parent>
    <groupId>com.example</groupId>
    <artifactId>springboot-shiro</artifactId>
    <version>0.0.1-SNAPSHOT</version>
    <name>springboot-shiro</name>
    <description>springboot-shiro</description>
    <properties>
        <java.version>8</java.version>
    </properties>
    <dependencies>
        <dependency>
            <groupId>org.apache.shiro</groupId>
            <artifactId>shiro-spring-boot-web-starter</artifactId>
            <version>1.10.1</version>
        </dependency>

        <!--mybatis-plus-->
        <dependency>
            <groupId>com.baomidou</groupId>
            <artifactId>mybatis-plus-boot-starter</artifactId>
            <version>3.5.2</version>
        </dependency>
        <!--mysql-->
        <dependency>
            <groupId>mysql</groupId>
            <artifactId>mysql-connector-java</artifactId>
            <version>8.0.30</version>
        </dependency>
        <dependency>
            <groupId>org.projectlombok</groupId>
            <artifactId>lombok</artifactId>
        </dependency>
        <dependency>
            <groupId>org.springframework.boot</groupId>
            <artifactId>spring-boot-starter-thymeleaf</artifactId>
        </dependency>
        <dependency>
            <groupId>org.springframework.boot</groupId>
            <artifactId>spring-boot-starter-test</artifactId>
        </dependency>
    </dependencies>

    <build>
        <plugins>
            <plugin>
                <groupId>org.springframework.boot</groupId>
                <artifactId>spring-boot-maven-plugin</artifactId>
                <configuration>
                    <excludes>
                        <exclude>
                            <groupId>org.projectlombok</groupId>
                            <artifactId>lombok</artifactId>
                        </exclude>
                    </excludes>
                </configuration>
            </plugin>
        </plugins>
    </build>
</project>
2
3
4
5
6
7
8
9
10
11
12
13
14
15
16
17
18
19
20
21
22
23
24
25
26
27
28
29
30
31
32
33
34
35
36
37
38
39
40
41
42
43
44
45
46
47
48
49
50
51
52
53
54
55
56
57
58
59
60
61
62
63
64
65
66
67
68
3、添加配置文件
添加配置文件 application.yml,添加基础配置。
mybatis-plus:
  configuration:
    log-impl: org.apache.ibatis.logging.stdout.StdOutImpl
  mapper-locations: classpath:mapper/*.xml
spring:
  datasource:
    type: com.zaxxer.hikari.HikariDataSource
    driver-class-name: com.mysql.cj.jdbc.Driver
    url: jdbc:mysql://192.168.25.10:3306/shirodb?characterEncoding=utf8&zeroDateTimeBehavior=convertToNull&useSSL=false&allowMultiQueries=true&useJDBCCompliantTimezoneShift=true&useLegacyDatetimeCode=false&serverTimezone=Asia/Shanghai&nullCatalogMeansCurrent=true&allowPublicKeyRetrieval=true
    username: root
    password: 111111
  jackson:
    date-format: yyyy-MM-dd HH:mm:ss
    time-zone: GMT+8
  thymeleaf:
    cache: false
shiro:
  loginUrl: /login
server:
  port: 8888
2
3
4
5
6
7
8
9
10
11
12
13
14
15
16
17
18
19
20
4、添加启动类
@SpringBootApplication
public class SpringbootShiroApplication {
    public static void main(String[] args) {
        SpringApplication.run(SpringbootShiroApplication.class, args);
    }
}
2
3
4
5
6
# 登录认证实现
访问数据库获取用户信息,实现登录认证。
# 创建表结构
CREATE DATABASE IF NOT EXISTS `shirodb` CHARACTER SET utf8mb4;
USE `shirodb`;
CREATE TABLE `user` (
     `id` BIGINT(20) NOT NULL AUTO_INCREMENT COMMENT '编号',
     `name` VARCHAR(30) DEFAULT NULL COMMENT '用户名',
     `pwd` VARCHAR(50) DEFAULT NULL COMMENT '密码',
     `rid` BIGINT(20) DEFAULT NULL COMMENT '角色编号',
 PRIMARY KEY (`id`)
) ENGINE=INNODB AUTO_INCREMENT=2 DEFAULT CHARSET=utf8 COMMENT='用户表';

INSERT INTO `shirodb`.`user`(`id`, `name`, `pwd`, `rid`) VALUES (2, 'dfd', '3a68179043820325eb69b21597630d04cb87aa1859054fa35fb51e2ed4300b23', NULL);
2
3
4
5
6
7
8
9
10
11
# 创建相关的类
(1)创建实体类
/**
 * 用户表
 */
@TableName(value = "`user`")
@AllArgsConstructor
@NoArgsConstructor
@Data
public class User {
    public static final String COL_ID = "id";
    public static final String COL_NAME = "name";
    public static final String COL_PWD = "pwd";
    public static final String COL_RID = "rid";
    /**
     * 编号
     */
    @TableId(value = "id", type = IdType.AUTO)
    private Long id;
    /**
     * 用户名
     */
    @TableField(value = "`name`")
    private String name;
    /**
     * 密码
     */
    @TableField(value = "pwd")
    private String pwd;
    /**
     * 角色编号
     */
    @TableField(value = "rid")
    private Long rid;
}
2
3
4
5
6
7
8
9
10
11
12
13
14
15
16
17
18
19
20
21
22
23
24
25
26
27
28
29
30
31
32
33
(2)创建 Mapper
@Mapper
public interface UserMapper extends BaseMapper<User> {
}
2
3
(3)创建 Service
public interface UserService extends IService<User>{
    public User getUserByName(String name);
}

//impl
@Service
public class UserServiceImpl extends ServiceImpl<UserMapper, User> implements UserService {
    @Autowired
    private UserMapper userMapper;

    /**
     * 根据用户名查询用户信息
     * @param name  用户名
     * @return  {@link User}
     */
    @Override
    public User getUserByName(String name) {
        User user = userMapper.selectOne(new QueryWrapper<User>().eq(User.COL_NAME, name));
        return user;
    }
}
2
3
4
5
6
7
8
9
10
11
12
13
14
15
16
17
18
19
20
21
22
(4)自定义 Realm
/**
 * 自定义登录认证
 */
@Component
public class CustomRealm extends AuthorizingRealm {
    @Autowired
    private UserService userService;

    //授权
    @Override
    protected AuthorizationInfo doGetAuthorizationInfo(PrincipalCollection principals) {
        return null;
    }

    //认证
    @Override
    protected AuthenticationInfo doGetAuthenticationInfo(AuthenticationToken token) throws AuthenticationException {
        //1 获取身份信息
        String principal = token.getPrincipal().toString();
        User user = userService.getUserByName(principal);
        if (null != user) {
            //判断密码是否正确
            return new SimpleAuthenticationInfo(principal, user.getPwd(),
                    ByteSource.Util.bytes("salt"), getName());
        }
        return null;
    }
}
2
3
4
5
6
7
8
9
10
11
12
13
14
15
16
17
18
19
20
21
22
23
24
25
26
27
28
(5)编写配置类
@Configuration
public class ShiroConfig {
    @Autowired
    private CustomRealm customRealm;

    @Bean
    public DefaultShiroFilterChainDefinition shiroFilterChainDefinition() {
        DefaultShiroFilterChainDefinition chainDefinition = new DefaultShiroFilterChainDefinition();
        //设置不认证可以访问的资源
        chainDefinition.addPathDefinition("/user/login", "anon");
        chainDefinition.addPathDefinition("/login", "anon");
        //设置需要进行登录认证的拦截范围
        chainDefinition.addPathDefinition("/**", "authc");
        return chainDefinition;
    }

    @Bean
    public DefaultWebSecurityManager webSecurityManager() {
        //1 创建 defaultWebSecurityManager 对象
        DefaultWebSecurityManager defaultWebSecurityManager = new DefaultWebSecurityManager();
        //2 创建认证对象,并设置认证策略
        ModularRealmAuthenticator modularRealmAuthenticator = new ModularRealmAuthenticator();
        modularRealmAuthenticator.setAuthenticationStrategy(new AllSuccessfulStrategy());
        //2 创建加密对象,并设置相关属性
        HashedCredentialsMatcher matcher = new HashedCredentialsMatcher();
        //2.1 采用 md5 加密
        matcher.setHashAlgorithmName(Sha256Hash.ALGORITHM_NAME);
        //2.2 迭代加密次数
        matcher.setHashIterations(3);
        //3 将加密对象存储到 myRealm 中
        customRealm.setCredentialsMatcher(matcher);
        //4 将 myRealm 存入 defaultWebSecurityManager 对象
        defaultWebSecurityManager.setRealm(customRealm);
        //5 返回
        return defaultWebSecurityManager;
    }

    @Bean
    public AuthorizationAttributeSourceAdvisor getAuthorizationAttributeSourceAdvisor() {
        AuthorizationAttributeSourceAdvisor sourceAdvisor = new AuthorizationAttributeSourceAdvisor();
        sourceAdvisor.setSecurityManager(webSecurityManager());
        return sourceAdvisor;
    }
}
2
3
4
5
6
7
8
9
10
11
12
13
14
15
16
17
18
19
20
21
22
23
24
25
26
27
28
29
30
31
32
33
34
35
36
37
38
39
40
41
42
43
44
(6)编写 Controller
@Controller
@RequestMapping("user")
public class UserController {

    @PostMapping("login")
    @ResponseBody
    public String userLogin(@RequestParam("username") String username, @RequestParam("password") String password) {
        //1 获取 Subject 对象
        Subject subject = SecurityUtils.getSubject();
        //2 封装请求数据到 token 对象中
        AuthenticationToken token = new UsernamePasswordToken(name, pwd);
        //3 调用 login 方法进行登录认证
        try
        {
            subject.login(token);
            return "登录成功";
        } catch(AuthenticationException e)
        {
            e.printStackTrace();
            System.out.println("登录失败");
            return "登录失败";
        }
    }
}
2
3
4
5
6
7
8
9
10
11
12
13
14
15
16
17
18
19
20
21
22
23
24
(7) 测试
http://localhost:8888/user/login?username=dfd&password=dfd
# 整合前端页面
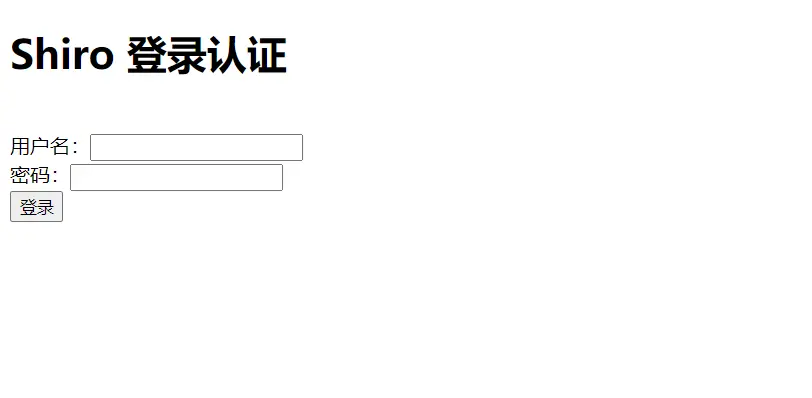
(1)添加页面 login.html
<!DOCTYPE html>
<html lang="en">
<head>
    <meta charset="UTF-8">
    <title>Shiro 登录认证</title>
</head>
<body>
<h1>Shiro 登录认证</h1>
<br>
<form action="/user/login" method="post">
    <div>用户名:<input name="username" type="text" value=""></div>
    <div>密码:<input name="password" type="password" value=""></div>
    <div><input type="submit" value="登录"></div>
</form>
</body>
</html>
2
3
4
5
6
7
8
9
10
11
12
13
14
15
16
(2)添加页面 main.html
<!DOCTYPE html>
<html lang="en" xmlns:th="http://www.thymeleaf.org">
<head>
    <meta charset="UTF-8">
    <title>Shiro 登录认证后主页面</title>
</head>
<body>
<h1>Shiro 登录认证后主页面</h1>
<br>
登录用户为:<span th:text="${session.user}"></span>
</body>
2
3
4
5
6
7
8
9
10
11
(3)添加 Controller 方法,改造认证方法
@Controller
public class IndexLogin {
    //跳转登录页面
    @GetMapping("login")
    public String login() {
        return "login";
    }
}
2
3
4
5
6
7
8
@Controller
@RequestMapping("user")
public class UserController {

    @PostMapping("login")
    public String userLogin(@RequestParam("username") String username, @RequestParam("password") String password, HttpSession session) {
        //1 获取 Subject 对象
        Subject subject = SecurityUtils.getSubject();
        //2 封装请求数据到 token 对象中
        AuthenticationToken token = new UsernamePasswordToken(username, password);
        //3 调用 login 方法进行登录认证
        try {
            subject.login(token);
            session.setAttribute("user", token.getPrincipal().toString());
            return "main";
        } catch (AuthenticationException e) {
            e.printStackTrace();
            session.setAttribute("fail", e.getMessage());
            return "fail";
        }
    }
}
2
3
4
5
6
7
8
9
10
11
12
13
14
15
16
17
18
19
20
21
22
(4)启动,访问测试
# 多个 Realm 的认证策略设置
# 多个 Realm 实现原理
当应用程序配置多个 Realm 时,例如:用户名密码校验、手机号验证码校验等等。 Shiro 的 ModularRealmAuthenticator 会使用内部的 AuthenticationStrategy 组件判断认 证是成功还是失败。
AuthenticationStrategy 是一个无状态的组件,它在身份验证尝试中被询问 4 次(这 4 次交互所需的任何必要的状态将被作为方法数):
- 在所有 Realm 被调用之前。
- 在调用 Realm 的 getAuthenticationInfo 方法之前。
- 在调用 Realm 的 getAuthenticationInfo 方法之后。
- 在所有 Realm 被调用之后。
认证策略的另外一项工作就是聚合所有 Realm 的结果信息封装至一个 AuthenticationInfo 实例中,并将此信息返回,以此作为 Subject 的身份信息。
Shiro 中定义了 3 种认证策略的实现:
| AuthenticationStrategy class | 描述 |
|---|---|
| AtLeastOneSuccessfulStrategy | 只要有一个(或更多)的 Realm 验证成功,那么认证将视为成功 |
| FirstSuccessfulStrategy | 第一个 Realm 验证成功,整体认证将视为成功,且后续 Realm 将被忽略 |
| AllSuccessfulStrategy | 所有 Realm 成功,认证才视为成功 |
ModularRealmAuthenticator 内置的认证策略默认实现是 AtLeastOneSuccessfulStrategy 方式。可以通过配置修改策略
# 多个 Realm 代码实现
复制一份相同的 Realm,命名为 CustomRealm2。修改 ShiroConfig
@Configuration
public class ShiroConfig {
    @Autowired
    private CustomRealm customRealm;
    @Autowired
    private CustomRealm2 customRealm2;

    @Bean
    public DefaultShiroFilterChainDefinition shiroFilterChainDefinition() {
        DefaultShiroFilterChainDefinition chainDefinition = new DefaultShiroFilterChainDefinition();
        //设置不认证可以访问的资源
        chainDefinition.addPathDefinition("/user/login", "anon");
        chainDefinition.addPathDefinition("/login", "anon");
        //设置需要进行登录认证的拦截范围
        chainDefinition.addPathDefinition("/**", "authc");
        return chainDefinition;
    }

    @Bean
    public DefaultWebSecurityManager webSecurityManager() {
        //1 创建 defaultWebSecurityManager 对象
        DefaultWebSecurityManager defaultWebSecurityManager = new DefaultWebSecurityManager();
        //2 创建认证对象,并设置认证策略
        ModularRealmAuthenticator modularRealmAuthenticator = new ModularRealmAuthenticator();
        modularRealmAuthenticator.setAuthenticationStrategy(new AllSuccessfulStrategy());
        //2 创建加密对象,并设置相关属性
        HashedCredentialsMatcher matcher = new HashedCredentialsMatcher();
        //2.1 采用 md5 加密
        matcher.setHashAlgorithmName(Sha256Hash.ALGORITHM_NAME);
        //2.2 迭代加密次数
        matcher.setHashIterations(3);
        //3 将加密对象存储到 myRealm 中
        customRealm.setCredentialsMatcher(matcher);
        //4 将 myRealms 存入 defaultWebSecurityManager 对象
        defaultWebSecurityManager.setRealms(Arrays.asList(customRealm2, customRealm));
        //5 返回
        return defaultWebSecurityManager;
    }

    @Bean
    public AuthorizationAttributeSourceAdvisor getAuthorizationAttributeSourceAdvisor() {
        AuthorizationAttributeSourceAdvisor sourceAdvisor = new AuthorizationAttributeSourceAdvisor();
        sourceAdvisor.setSecurityManager(webSecurityManager());
        return sourceAdvisor;
    }

}
2
3
4
5
6
7
8
9
10
11
12
13
14
15
16
17
18
19
20
21
22
23
24
25
26
27
28
29
30
31
32
33
34
35
36
37
38
39
40
41
42
43
44
45
46
47
# Remember Me 功能
Shiro 提供了记住我(RememberMe)的功能,比如访问一些网站时,关闭了浏览器,下次再打开时还是能记住你是谁,下次访问时无需再登录即可访问。
# 基本流程
- 首先在登录页面选中 RememberMe 然后登录成功;如果是浏览器登录,一般会 把 RememberMe 的 Cookie 写到客户端并保存下来
- 关闭浏览器再重新打开;会发现浏览器还是记住你的。
- 访问一般的网页服务器端,仍然知道你是谁,且能正常访问。
- 但是,如果我们访问电商平台时,如果要查看我的订单或进行支付时,此时还 是需要再进行身份认证的,以确保当前用户还是你。
# 代码实现
@Configuration
public class ShiroConfig {
    @Autowired
    private CustomRealm customRealm;
    @Autowired
    private CustomRealm2 customRealm2;

    @Bean
    public DefaultShiroFilterChainDefinition shiroFilterChainDefinition() {
        DefaultShiroFilterChainDefinition chainDefinition = new DefaultShiroFilterChainDefinition();
        //设置不认证可以访问的资源
        chainDefinition.addPathDefinition("/user/login", "anon");
        chainDefinition.addPathDefinition("/login", "anon");
        //设置需要进行登录认证的拦截范围
        chainDefinition.addPathDefinition("/**", "authc");
        //设置RememberMe
        chainDefinition.addPathDefinition("/**", "user");
        return chainDefinition;
    }

    @Bean
    public DefaultWebSecurityManager webSecurityManager() {
        //1 创建 defaultWebSecurityManager 对象
        DefaultWebSecurityManager defaultWebSecurityManager = new DefaultWebSecurityManager();
        //2 创建认证对象,并设置认证策略
        ModularRealmAuthenticator modularRealmAuthenticator = new ModularRealmAuthenticator();
        modularRealmAuthenticator.setAuthenticationStrategy(new AllSuccessfulStrategy());
        //2 创建加密对象,并设置相关属性
        HashedCredentialsMatcher matcher = new HashedCredentialsMatcher();
        //2.1 采用 md5 加密
        matcher.setHashAlgorithmName(Sha256Hash.ALGORITHM_NAME);
        //2.2 迭代加密次数
        matcher.setHashIterations(3);
        //3 将加密对象存储到 myRealm 中
        customRealm.setCredentialsMatcher(matcher);
        //4 将 myRealm 存入 defaultWebSecurityManager 对象
        defaultWebSecurityManager.setRealms(Arrays.asList(customRealm2, customRealm));
        //5 设置Remember me
        defaultWebSecurityManager.setRememberMeManager(rememberMeManager());
        //6 返回
        return defaultWebSecurityManager;
    }

    private RememberMeManager rememberMeManager() {
        CookieRememberMeManager rememberMeManager = new CookieRememberMeManager();
        rememberMeManager.setCookie(rememberMeCookie());
        rememberMeManager.setCipherKey(Base64.decode("4AvVhmFLUs0KTA3Kprsdag=="));
        return rememberMeManager;
    }

    /**
     * 生成Cookie
     * @return
     */
    private Cookie rememberMeCookie() {
        SimpleCookie cookie = new SimpleCookie("rememberMe");
        //设置跨域
        //cookie.setDomain(domain);
        cookie.setPath("/");
        cookie.setHttpOnly(true);
        cookie.setMaxAge(30 * 24 * 60 * 60);
        return cookie;
    }

    @Bean
    public AuthorizationAttributeSourceAdvisor getAuthorizationAttributeSourceAdvisor() {
        AuthorizationAttributeSourceAdvisor sourceAdvisor = new AuthorizationAttributeSourceAdvisor();
        sourceAdvisor.setSecurityManager(webSecurityManager());
        return sourceAdvisor;
    }

}
2
3
4
5
6
7
8
9
10
11
12
13
14
15
16
17
18
19
20
21
22
23
24
25
26
27
28
29
30
31
32
33
34
35
36
37
38
39
40
41
42
43
44
45
46
47
48
49
50
51
52
53
54
55
56
57
58
59
60
61
62
63
64
65
66
67
68
69
70
71
72
@Controller
@RequestMapping("user")
public class UserController {
    @PostMapping("login")
    public String userLogin(@RequestParam(defaultValue = "false") boolean rememberMe, @RequestParam("username") String username, @RequestParam("password") String password, HttpSession session) {
        //1 获取 Subject 对象
        Subject subject = SecurityUtils.getSubject();
        //2 封装请求数据到 token 对象中
        AuthenticationToken token = new UsernamePasswordToken(username, password, rememberMe);
        //3 调用 login 方法进行登录认证
        try {
            subject.login(token);
            session.setAttribute("user", token.getPrincipal().toString());
            return "main";
        } catch (AuthenticationException e) {
            e.printStackTrace();
            session.setAttribute("fail", e.getMessage());
            return "fail";
        }
    }

    //登录认证验证 rememberMe
    @GetMapping("rememberMe")
    public String userLogin() {
        //二次打开浏览器时,无法在session中得到"user"
        //二次打开浏览器时,即使数据库中的密码发生变化,仍能访问资源
        return "main";
    }
}
2
3
4
5
6
7
8
9
10
11
12
13
14
15
16
17
18
19
20
21
22
23
24
25
26
27
28
29
# 测试
通过地址访问 rememberMe
http://localhost:8080/user/rememberMe
过滤器拦截跳回登录页面
勾选记住我登录后,可以正常访问
然后关闭浏览器,继续访问
http://localhost:8080/user/rememberMe
不会被拦截器拦截
但是二次打开浏览器时,无法在session中得到"user"
2
3
4
5
6
7
8
# 用户登出
用户登录后,配套的有登出操作。直接通过 Shiro 过滤器即可实现登出。
# 代码实现
修改 main.html
<!DOCTYPE html>
<html lang="en" xmlns:th="http://www.thymeleaf.org">
<head>
    <meta charset="UTF-8">
    <title>Shiro 登录认证后主页面</title>
</head>
<body>
<h1>Shiro 登录认证后主页面</h1>
<br>
登录用户为:<span th:text="${session.user}"></span>
<br>
<a href="/logout">登出</a>
</body>
2
3
4
5
6
7
8
9
10
11
12
13
修改配置类
@Bean
public DefaultShiroFilterChainDefinition shiroFilterChainDefinition() {
    DefaultShiroFilterChainDefinition chainDefinition = new DefaultShiroFilterChainDefinition();
    //设置不认证可以访问的资源
    chainDefinition.addPathDefinition("/user/login", "anon");
    chainDefinition.addPathDefinition("/login", "anon");
    //配置登出过滤器
    chainDefinition.addPathDefinition("/logout","logout");
    //设置需要进行登录认证的拦截范围
    chainDefinition.addPathDefinition("/**", "authc");
    //设置RememberMe
    chainDefinition.addPathDefinition("/**", "user");
    return chainDefinition;
}
2
3
4
5
6
7
8
9
10
11
12
13
14
# 授权、角色认证
# 授权
用户登录后,需要验证是否具有指定角色指定权限。Shiro 也提供了方便的工具进行判断。
这个工具就是 Realm 的 doGetAuthorizationInfo 方法进行判断。触发权限判断的有两种方式。
(1)在页面中通过 shiro:xx 属性判断
(2)在接口服务中通过注解 @Requires**xx**** 进行判断
# 后端接口服务注解
通过给接口服务方法添加注解可以实现权限校验,可以加在控制器方法上,也可以加 在业务方法上,一般加在控制器方法上。常用注解如下:
@RequiresAuthentication
验证用户是否登录,等同于方法 subject.isAuthenticated ()
@RequiresUser
- 验证用户是否被记忆:
- 登录认证成功 subject.isAuthenticated () 为 true
- 登录后被记忆 subject.isRemembered () 为 true
- 验证用户是否被记忆:
@RequiresGuest
- 验证是否是一个 guest 的请求,是否是游客的请求
- 此时 subject.getPrincipal () 为 null
@RequiresRoles
验证 subject 是否有相应角色,有角色访问方法,没有则会抛出异常 AuthorizationException。
@RequiresRoles(“aRoleName”)
public void someMethod(); //只有subject有aRoleName角色才能访问方法someMethod()
1
2
@RequiresPermissions
验证 subject 是否有相应权限,有权限访问方法,没有则会抛出异常 AuthorizationException。
@RequiresPermissions(“file:read”,”wite:aFile.txt”)
public void someMethod(); //subject必须同时含有file:read和wite:aFile.txt权限才能访问方法someMethod()
1
2
# 授权验证
(1)创建表
create table shirodb.role
(
    id       bigint auto_increment comment '编号'
        primary key,
    name     varchar(30) null comment '角色名',
    `desc`   varchar(50) null comment '描述',
    realname varchar(20) null comment '角色显示名'
)
comment '角色表' charset = utf8;

create table shirodb.role_user
(
    id  bigint auto_increment comment '编号'
        primary key,
    uid bigint null comment '用户 id',
    rid bigint null comment '角色 id'
)
comment '角色用户映射表' charset = utf8;

create table shirodb.permissions
(
    id     bigint auto_increment comment '编号'
        primary key,
    name   varchar(30) null comment '权限名',
    info   varchar(30) null comment '权限信息',
    `desc` varchar(50) null comment '描述'
)
comment '权限表' charset = utf8;

create table shirodb.role_ps
(
    id  bigint auto_increment comment '编号'
        primary key,
    rid bigint null comment '角色 id',
    pid bigint null comment '权限 id'
)
comment '角色权限映射' charset = utf8;
2
3
4
5
6
7
8
9
10
11
12
13
14
15
16
17
18
19
20
21
22
23
24
25
26
27
28
29
30
31
32
33
34
35
36
37
(2)修改 Controller
//登录认证验证角色
@RequiresRoles(value = {"userMag"})
@GetMapping("roles")
@ResponseBody
public String userLoginRoles() {
    log.info("登录认证验证角色");
    return "验证角色成功";
}

//登录认证验证权限
@RequiresPermissions(value = {"user:delete"})
@GetMapping("permissions")
@ResponseBody
public String userLoginPermissions() {
    log.info("登录认证验证权限");
    return "验证权限成功";
}
2
3
4
5
6
7
8
9
10
11
12
13
14
15
16
17
(3)新增 Mapper
@Mapper
public interface RoleMapper extends BaseMapper<Role> {
    /**
     * 根据用户名查询角色列表
     * @param userName  用户名
     * @return 角色名称集合
     */
    List<String> selectRolesByUserName(String userName);
}

@Mapper
public interface PermissionsMapper extends BaseMapper<Permissions> {
    /**
     * 根据角色的集合查询所对应的权限集合
     * @param roleList 角色集合
     * @return 权限名称集合
     */
    List<String> selectPermissionsByRoleList(@Param("roles") List<String> roleList);
}
2
3
4
5
6
7
8
9
10
11
12
13
14
15
16
17
18
19
<select id="selectRolesByUserName" resultType="java.lang.String">
    select name
    from role
    where id in (select rid from role_user where uid in (select id from user where name =
    #{userName,jdbcType=VARCHAR}))
</select>

<select id="selectPermissionsByRoleList" resultType="java.lang.String">
    SELECT p.info
    FROM permissions p
    WHERE
    p.id IN (
    SELECT rp.pid
    FROM role_ps rp
    WHERE
    rp.rid IN ( SELECT r.id
    FROM role r WHERE r.name IN (
    <foreach collection='roles' item='name' separator=','
             open='('
             close=')'>
        #{name,jdbcType=VARCHAR}
    </foreach>
    )))
</select>
2
3
4
5
6
7
8
9
10
11
12
13
14
15
16
17
18
19
20
21
22
23
24
(4)CustomRealm 改造
//授权
@Override
protected AuthorizationInfo doGetAuthorizationInfo(PrincipalCollection principals) {
    log.info("进入自定义授权的方法");
    //1 创建对象,存储当前登录的用户的权限和角色
    SimpleAuthorizationInfo info = new SimpleAuthorizationInfo();
    String userName = principals.getPrimaryPrincipal().toString();
    List<String> roleList;
    List<String> permissionsList;
    if (StrUtil.equals(userName, "admin")) {
        //超级管理员,拥有所有的权限和角色
        roleList = roleService.list().stream().map(Role::getName).collect(Collectors.toList());
        permissionsList = permissionsService.list().stream().map(Permissions::getInfo).collect(Collectors.toList());
    } else {
        //2 从数据库查询角色
        roleList = roleService.selectRolesByUserName(userName);
        //3 从数据库查询权限
        permissionsList = permissionsService.selectPermissionsByRoleList(roleList);
    }
    //4 设置角色和权限
    info.setRoles((CollUtil.newHashSet(roleList)));
    info.setStringPermissions((CollUtil.newHashSet(permissionsList)));
    return info;
}
2
3
4
5
6
7
8
9
10
11
12
13
14
15
16
17
18
19
20
21
22
23
24
(5)main.html 改造
<!DOCTYPE html>
<html lang="en" xmlns:th="http://www.thymeleaf.org">
<head>
    <meta charset="UTF-8">
    <title>Shiro 登录认证后主页面</title>
</head>
<body>
<h1>Shiro 登录认证后主页面</h1>
<br>
登录用户为:<span th:text="${session.user}"></span>
<br>
<a href="/logout">登出</a>
<br>
<a href="/user/roles">测试授权-角色验证</a>
<br>
<a href="/user/permissions">测试授权-权限验证</a>
</body>
2
3
4
5
6
7
8
9
10
11
12
13
14
15
16
17
(6)异常处理
/**
 * 权限异常处理
 */
@RestControllerAdvice
public class PermissionsException {
    @ExceptionHandler(UnauthorizedException.class)
    public String unauthorizedException(Exception ex) {
        return "无权限";
    }

    @ExceptionHandler(AuthorizationException.class)
    public String authorizationException(Exception ex) {
        return "权限认证失败";
    }
}
2
3
4
5
6
7
8
9
10
11
12
13
14
15